Showing posts with label tutorials. Show all posts

Scattered Color Pop (Mini Tutorial Included)

>> Tuesday, November 13, 2012


There's nothing like a quilt show & sale to make quilt tops jump off the shelf and get themselves backed, quilted, and bound. I might have played a little role in this process, but the importance of deadlines in my life cannot be overstated. I made this quilt top last winter, after which I dallied finishing it. Most of my sewing projects arise with a recipient in mind, whereas this one started with an idea and no recipient, which is where the no deadline issue arose. But finished it is. And love it I do.


A few people asked me about size, fabric requirements, and the like so I'm going to provide a mini-pattern-tutorial. As half-square triangles represent the entirety of the block-making, and the layout is random, I'm really only providing some numbers and measurements. This particular version finishes at about 54" x 58.5" (12 rows, 13 columns), but it's super easy to upsize or downsize: make more (or fewer) blocks. In other words, figure out the dimensions (rows/columns), multiply, and the product = necessary HST blocks.

Supplies
1 charm pack (42 5" squares)
25" of 3 coordinating solids, cross-cut in 5" WOF strips

Cut 5" strips into 38 5" squares (if you cut all the strips, you'll have 40 squares of each solid. You could use 40 each of 2 solids and 34 of another, thus only requiring 4.5 5" strips on one color (if, say, you have solid scraps and not quite 25" of one). I think I used 42 5" squares of the off-white and khaki, and 30 of the gold, but I can't recall and I'm too lazy to count HSTs in the quilt itself. The point is: this is a versatile, flexible design. Use what you have!

Divvy up each group of squares into thirds. You should have 12 piles. As 38 does not divide evenly into 3, the groups won't be the same size. Then pair up the piles as follows (substituting whatever colors you're using): (1) charms/off-white, (2) charms/khaki, (3) charms/gold, (4) off-white/khaki, (5) off-white/gold, and (6) gold/khaki. Make sure each pile consists of full pairs. The piles with the charms should have 14 charm/solid pairs, while the solid-solid piles will vary depending on how you divided 38.

Sew squares into half-square triangles, using your preferred method. I draw a diagonal line down the center, stitch a scant 1/4" on both sides, cut on the line, and voila, 2 HSTs ready to be pressed. Trim your blocks. With 5" starting squares, I usually trim down to 4 5/8" but you might be able to eek out 4.75" or prefer to play it safe with 4.5".

Lay it out -- I start by grabbing squares randomly and then rearranging to get a reasonable distribution of color. In the end, it is not random in the mathematical sense, but visually it feels random. Sew it up. Take a break, have a drink, eat a treat, and admire your lovely quilt top.


Since this quilt is now finished, it has a back too. I pretty much adore this quilt back. It's got bright colors, birds in cages, ugly ducklings, and a slight little angle that I'll pretend was completely intentional. Totally planned. Because that's how I do it. I pulled stash prints that coordinated with the charm pack (It's a Hoot), at which point I realized it needed a red binding.


So I made one. Bright red Riley Blake circles. Works with the front and the back.

Perhaps you'd like to see this quilt in person and possibly even buy it for yourself or a loved one? If you're in SE Michigan or NW Ohio or South-Central (???) Canada (what's the Windsor, ON region called?), it will be at the Ann Arbor Modern Quilt Guild Show & Sale this Thursday (November 15) at the Corner Brewery in Ypsi, 5-9 pm. You should come. If I don't know you, I'd love to meet you. And if it doesn't sell at the show, it might make its way to a little pop-up quilt, challah cover, and clutch sale here on the blog, in the near-ish future.

Read more...

Triangulate: Complete

>> Monday, November 5, 2012


I took pictures of this quilt over a month ago, when my backyard had only a sprinkling of leaves on it. There are many silly reasons I didn't post this quilt until now--and one serious one. It turns out that transferring pictures from the camera to the computer is somewhat essential to the blogging process, and not misplacing the cord that connects said technological devices is, well, somewhat imperative. But the cord has been located, the pictures moved, and the blog (is being) updated. This process has also revealed to me that these pictures are not, shall we say, the most amazing. I think I need some new photography angles and venues, and a human helper wouldn't hurt. But for now, they will suffice.


Way back when (in March), I asked the members of do.Good Stitches: Empower to make some triangle-in-triangle blocks. I had a vague notion in my head that they would be cool, and wrote up one way to make the blocks. But I had no real plan beyond that. After fussing with a number of possible layouts on my brother's living room floor, I built the quilt around triangles and lots of Kona charcoal. And then paused while I lived sans sewing machine and pondered the quilting options.


Echoing triangles -- a term I just made up -- won the quilt pondering (who knew it was a contest?). I wanted simple and non-distracting. If I were a fancy quilter, which I am certainly not, or owned a long-arm, which I definitely do not, I could imagine filling the charcoal with awesomely intricate quilting and doing something else I haven't really figured out in the triangles. But absent radical, magical changes in my life, neither of those things were happening. And since I hope this quilt will be well-used by whomever Alternatives for Girls gives it to, I wanted it to remain soft, which minimal quilting helps achieve. To bind it, I used a mixture of Terrain prints in orange and pink.


This is my second-to-last quilt for do.Good Stitches, at least for now. In September, the lovely Empower ladies made fantastic neutral log cabin blocks that I'll be putting together...soonish. I've truly enjoyed getting to know the other crafty women in my group, and love the concept of do.Good Stitches -- working with a group of people to make quilts and donating them. Last year, as I was traveling to archives for dissertation research, this project was one of several things that kept me grounded and provided a certain amount of regularity in a peripatetic (I just love that word!) life. But this year, as I'm sitting down to write, I've found that feeling grounded requires fewer obligations and more flexibility. As a result, after some hard thinking and internal debating, I decided that it was time to let dGS go. I have one more quilt to wrap up, and I look forward to seeing all the incredible quilts the group continues to make, but for now, watching from the sidelines is where I need to be. 

Read more...

Tutorial: How to Make a Challah Cover

>> Tuesday, August 7, 2012

One of the most frequent queries I get is "how do you make a challah cover?" I've avoided answering this question directly because there is no one way to do it. In a pinch, an unfolded napkin is just as functional in covering challah (delicious egg bread eaten on Shabbat (the Jewish Sabbath) and most Jewish holidays) as a beautiful silk-screened, embroidered, quilted, or otherwise crafted piece of art.

But Sew Mama Sew has provided me with a wonderful opportunity to demonstrate how to make a challah cover. The tutorial includes templates for paper-piecing Shabbat in Hebrew as well as complete cutting and piecing instructions. Even if you don't need one for yourself, here's a chance to impress your friends when you give them a fabulously modern challah cover with Hebrew letters. (A big thanks to Michelle, Anna, Brenda, and Torie for making sure the templates and instructions made sense to non-Hebrew speakers.) It may be in another language that uses a non-Roman alphabet, but you don't have to be able to read it to piece it!

Head over to SMS for my Challah Cover Tutorial. I'd love to see what you make!

p.s. If you want to machine-bind your challah cover, you can find my machine-binding tutorial here.

Read more...

Tutorial: Triangle-in-Triangle Blocks

>> Monday, February 27, 2012

While pretty and full of potential, square-in-square blocks must occasionally give way to other polygons. It's the triangle's turn, and I'll be asking my fellow quilters-in-crime to make triangle-in-triangle blocks for do.Good Stitches in March. Although trendy rarely describes two.hippos' general ethos, it turns out I am quite fashionable this month as Lynne will also be debuting some (wonky) triangle-in-triangle blocks.

These blocks are pretty easy--dare I say straightforward--to make. Start with an equilateral triangle of whatever size you prefer, add a border of another fabric, rinse and repeat until you get to the desired size. I started with 4 triangles ranging from 3" to 6" and it took 4 rounds to reach 12.5" from a point to an edge (that is, the line bisecting the triangle, not the length of the triangle's edge). 

This tutorial assumes basic sewing knowledge. It also assumes an ability and willingness to go with the flow since precise measurements are intentionally lacking. The amount of fabric you need will vary by a) the starting triangle and b) the width of the strips you attach to create the next triangle.

1. 
Cut out some equilateral triangles. Quick geometry review: equilateral triangles have three sides all the same length (hence: equal) which means each corner has a 60 degree angle. I happen to own a plastic template, but you can easily make your own by drawing a triangle, printing one from your computer, or using your cutting board which may well have 60 degree angles marked. If you're cutting a triangle from a charm square, a 4.5" one is your best bet.

2. 
Cut strips for to surround your triangle. They can be any width, though anything less than 1" may be a touch tricky the first time out. Make sure your strips extend beyond the points of the triangles. This is very important; otherwise you will not create a full triangle and will spend needless time ripping out seams. (Guess who did this the first time around?). I recommend erring on the side of lots to trim for trimming is far less time-consuming (albeit a little fabric-wasting) than seam-ripping and re-sewing.

3. 
Sew the first strip to one edge of the triangle. See how the strip extends way beyond the points? That's good. Now press your seam (I press open, but you could press to one side).

4. 
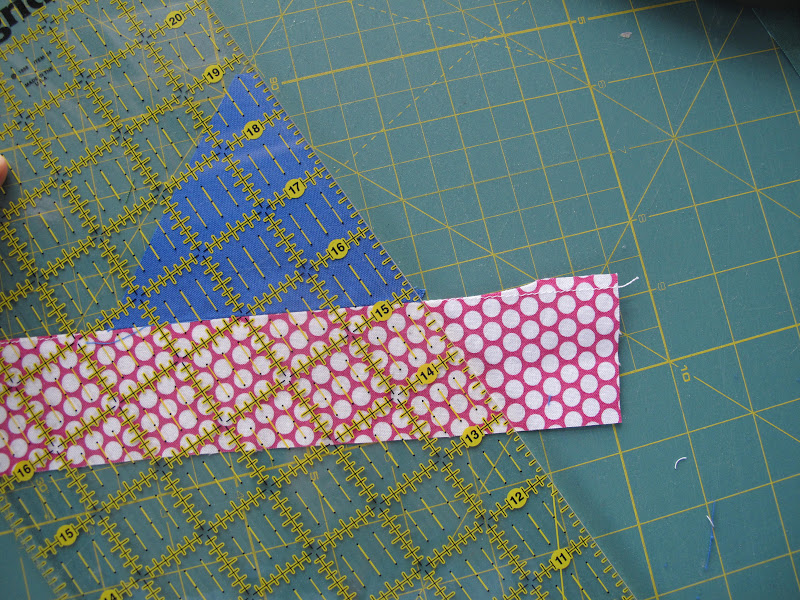
Now you can see why you need a strip longer than the triangle's edge! Line your ruler up with the triangle's edge and trim the newly added strip. Then trim the other side. All should be good.


5. 
Sew a strip to the next side. It doesn't really matter which one, as the both options are adjacent to the already-sewn side, but you'll probably want to continue adding strips in the same order. I tend to add them counter-clockwise. Why, I have no idea.

6.
Trim it up. You could stop here if you just want to make some tents -- for a campsite quilt perhaps?

7.
Add the third strip and trim it up. At this point, you also want to "triangle" up the block. Apply the same principle as squaring up blocks: decide how wide the strip should be, measure from the edge of the inner triangle/row (e.g., place the 1.5" line on the seam between the blue and pink), and trim. Repeat for each side. This ensures, to the best of bias edges' existence, that your triangle will remain a triangle.

8.
Rinse and repeat. Err, start adding a new round of strips: sew, trim, sew, trim, sew, trim. Triangle-up. Do this as many times as you need to get the desired size you would like.

9.
Admire your finished triangles. (Note: these are very easy to chain-piece, so if you know you'll be making more than one, I recommend chain-piecing.) Contemplate how to sew them together.

10.
The end. Or a few postscripts. 
a) you could add strips that are the same or different widths
b) contrasting widths can create cool effects
c) this is a great block for prints and solids
d) I'd love to see what you make
e) check back in April to see what I do with the dGS triangle blocks.

Read more...

Tutorial: How to Machine-Bind Your Quilt

>> Friday, June 10, 2011

I fully machine-bind my quilts. Back and front. No hand-stitching to finish. Call me a heretic, but I highly recommend it. It's fast, it's easy, it's even enjoyable. Sure, the stitches show on the binding, but if you blend your thread carefully, they only show if you look carefully. Or you can make them purposefully visible, as a design element. It's up to you.

Now, I admit that when I first started making quilts, binding was my least favorite part of the process. It may not have become my favorite, but I don't mind it. In a couple of episodes of Bones or Law & Order or NCIS or Criminal Minds (notice a pattern here), I can attached and complete the binding for a pretty big lap quilt. So when anyone asks me about how to get better at binding, my recurrent theme is practice, practice, practice. It's cliche, but I found that making challah covers really helped me figure it out. They're small and manageable and allow for a lot of binding practice in a short amount of time.

I've made a tutorial for my method of machine-binding your quilt (using double-fold binding). I asked a couple sewer friends, including Michelle, to read it over, but any errors are mine alone. I wrote it for a beginner audience, so that it's accessible to a new quilter. But a more experienced quilter can skip the first few steps about how to cut, sew, and press binding and move on to the method. The link below will take you to a downloadable pdf file, which allows you to print it and keep it near your sewing machine for reference. If you're unsure about a step or are confused or want more information, please leave a comment or email me.


This tutorial is for personal use only. 
If you want to teach it in a class, contact me before using and distributing it.

Read more...

Tutorial: Loop Bag

>> Wednesday, December 15, 2010

Loop Bag Tutorial


I was so pleased to hear how many of you are looking forward to this tutorial! It took me a little over an hour to make this while taking pictures and writing down steps, so it should be a quick bag for you to make. I've included detailed instructions and lots of pictures below in order to make this tutorial accessible for beginning sewers. More advanced sewers should be able to read through the steps quickly and probably won't need the pictures as a guide. I've provided the instructions for the basic bag, but there are innumerable ways to modify it -- different materials, contrast handles, embellishments such as trims or ric-rac, decorative stitching, etc. Have fun!

**This tutorial is for personal use ONLY.** 

The bag measures ~ 10.5"x7"x3".

Fabric Requirements:
1/3 yard quilting weight cotton (you'll have a bit left over)
11.5"x12.5" lightweight denim
lightweight interfacing (~20": wait to cut until step 5)
coordinating thread

*Note: I use a 1/4" inch seam except where noted otherwise.*

Instructions
{1}  
Cut your fabric
Take your 1/3 yard of fabric, trim the selvages, and cut it into the following pieces: 
(1) 12" x 18.5" (lining)
(2) 11.5" x 3.5" (exterior)
(1) 8"x 5" (short handle)
(1) 17" x 5" (long handle)
To maximize your fabric, first cut the 12" x 18.5" piece and set it aside. Cut the rest of the pieces out of the remaining fabric as follows:
Cut the 3.5" strip on the left first and then cut it in half. If it's not exactly 11.5", it's fine. You'll trim everything in a few steps. Then cut the 5" x 8" rectangle from the top, and then the 5" x 17" rectangle from the middle. These will become your handles.

{2}
Sew the bag exterior.
Sew the 11.5" x 3.5" fabric strips to both 11.5" sides of the denim panel.


Press the seams open.

Trim up your rectangle and measure it. 

It should be about 11.5" x 18.5". If it's a little bigger or smaller, that's fine. I suggest waiting to cut the interfacing so that you can make it the correct size for your rectangle.

{3}
Interface your bag exterior and handles.
Cut 3 pieces of interfacing: (1) 4.5" x 7.5"; (1) 4.5" x 16.5"; (1) 11" x 18" (or 1/2" less than the dimensions of your big rectangle).
Iron your interfacing to the wrong side of the fabric.


{4}
Make the handles. 
First fold the handle rectangles in half lengthwise and iron a crease.


Fold each edge toward the center and iron.


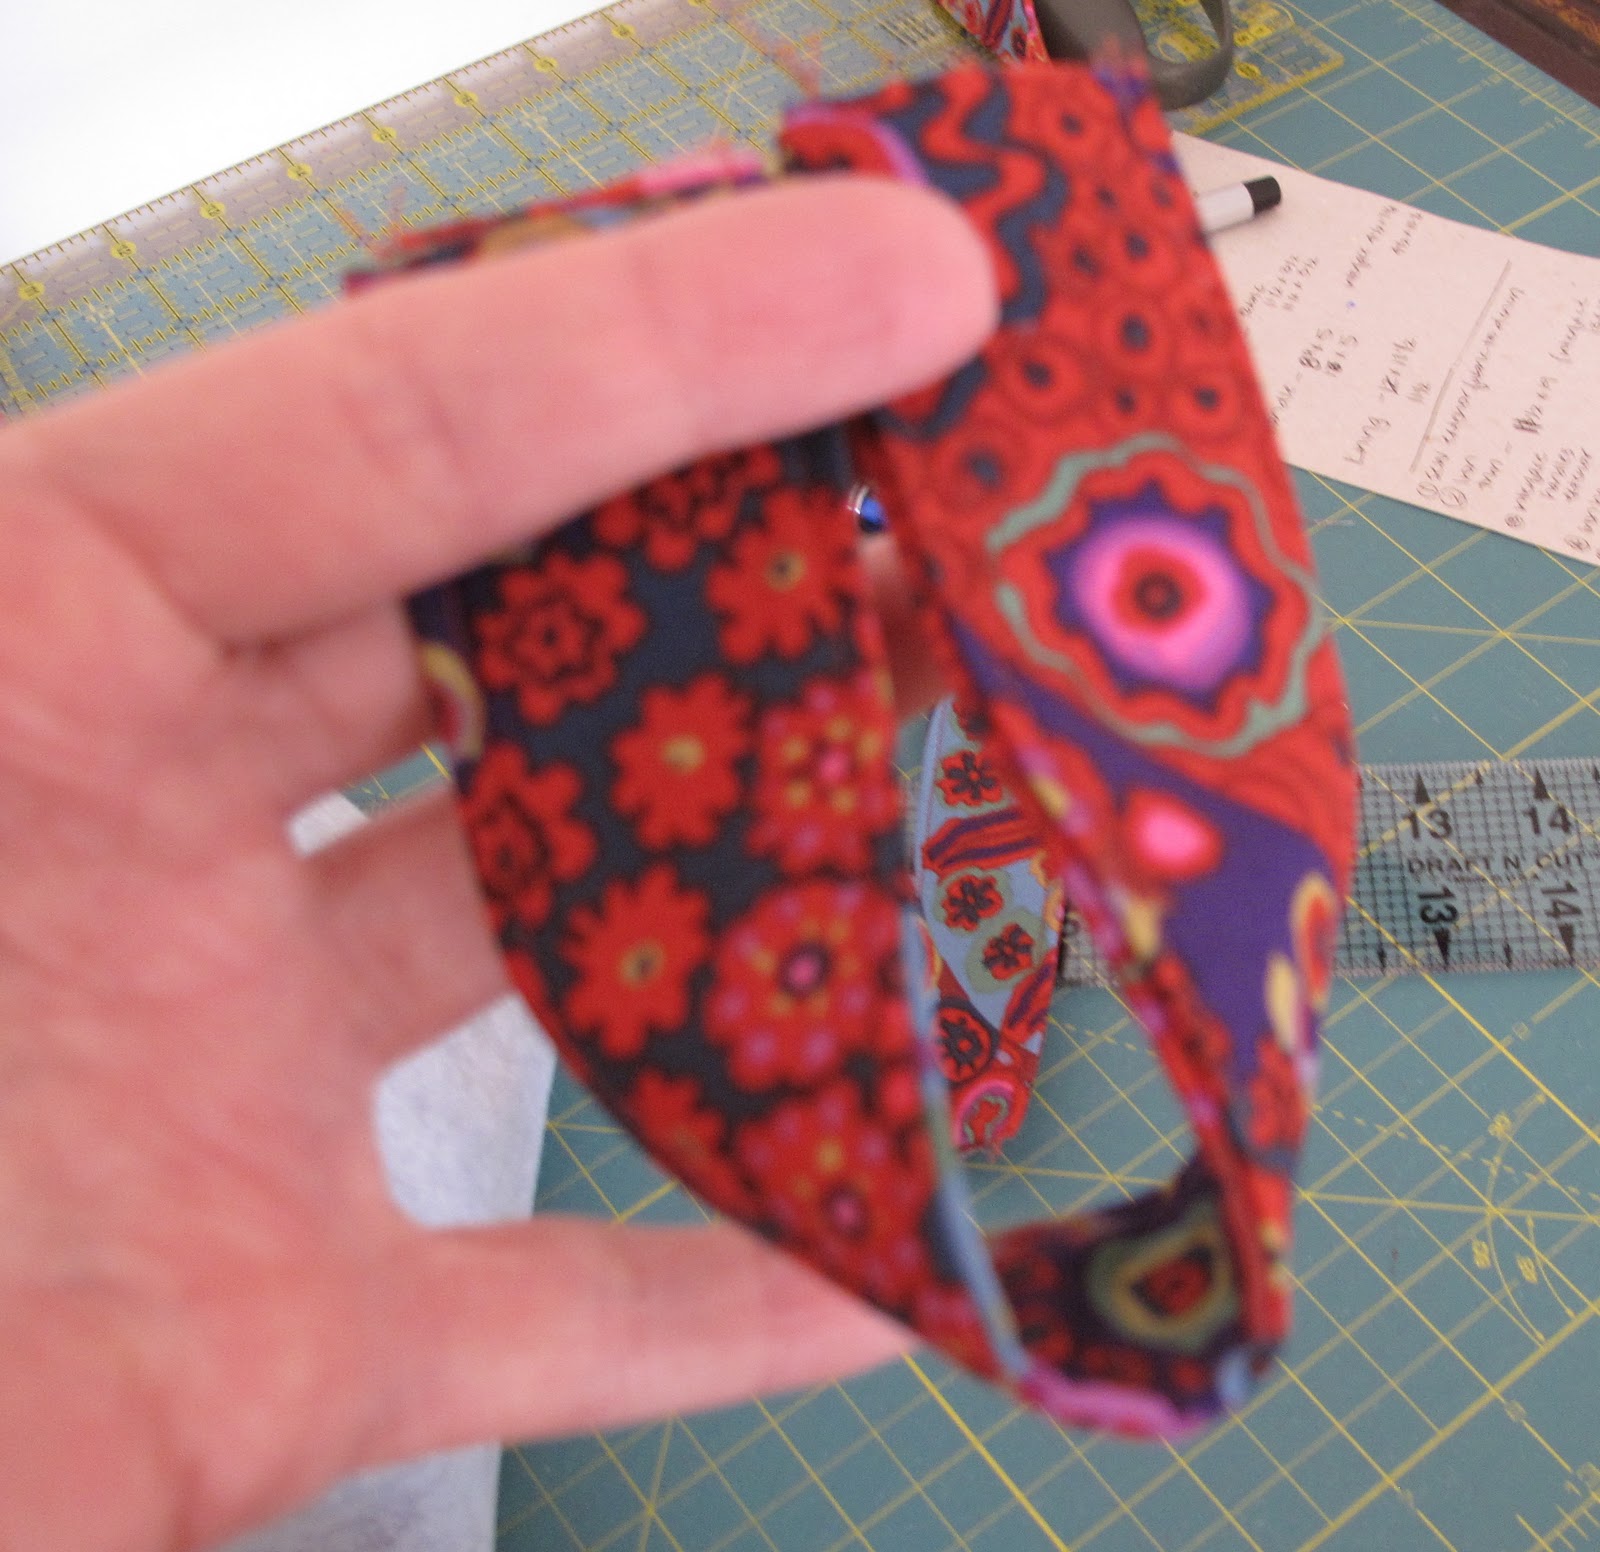
Fold both edges to the center and iron the strip -- it should be about 1.25" wide.


Finally, sew 1/8" from each side to hold the 1.25" strip in place.


Your handles, 1 short and 1 long, should look like this. Set them aside.


{5}
Sew the bag exterior and exteriors. 
Fold the exterior rectangle (denim + fabric) and lining rectangle in half with the short sides matching. 


Make sure to match the seams of the exterior rectangle.


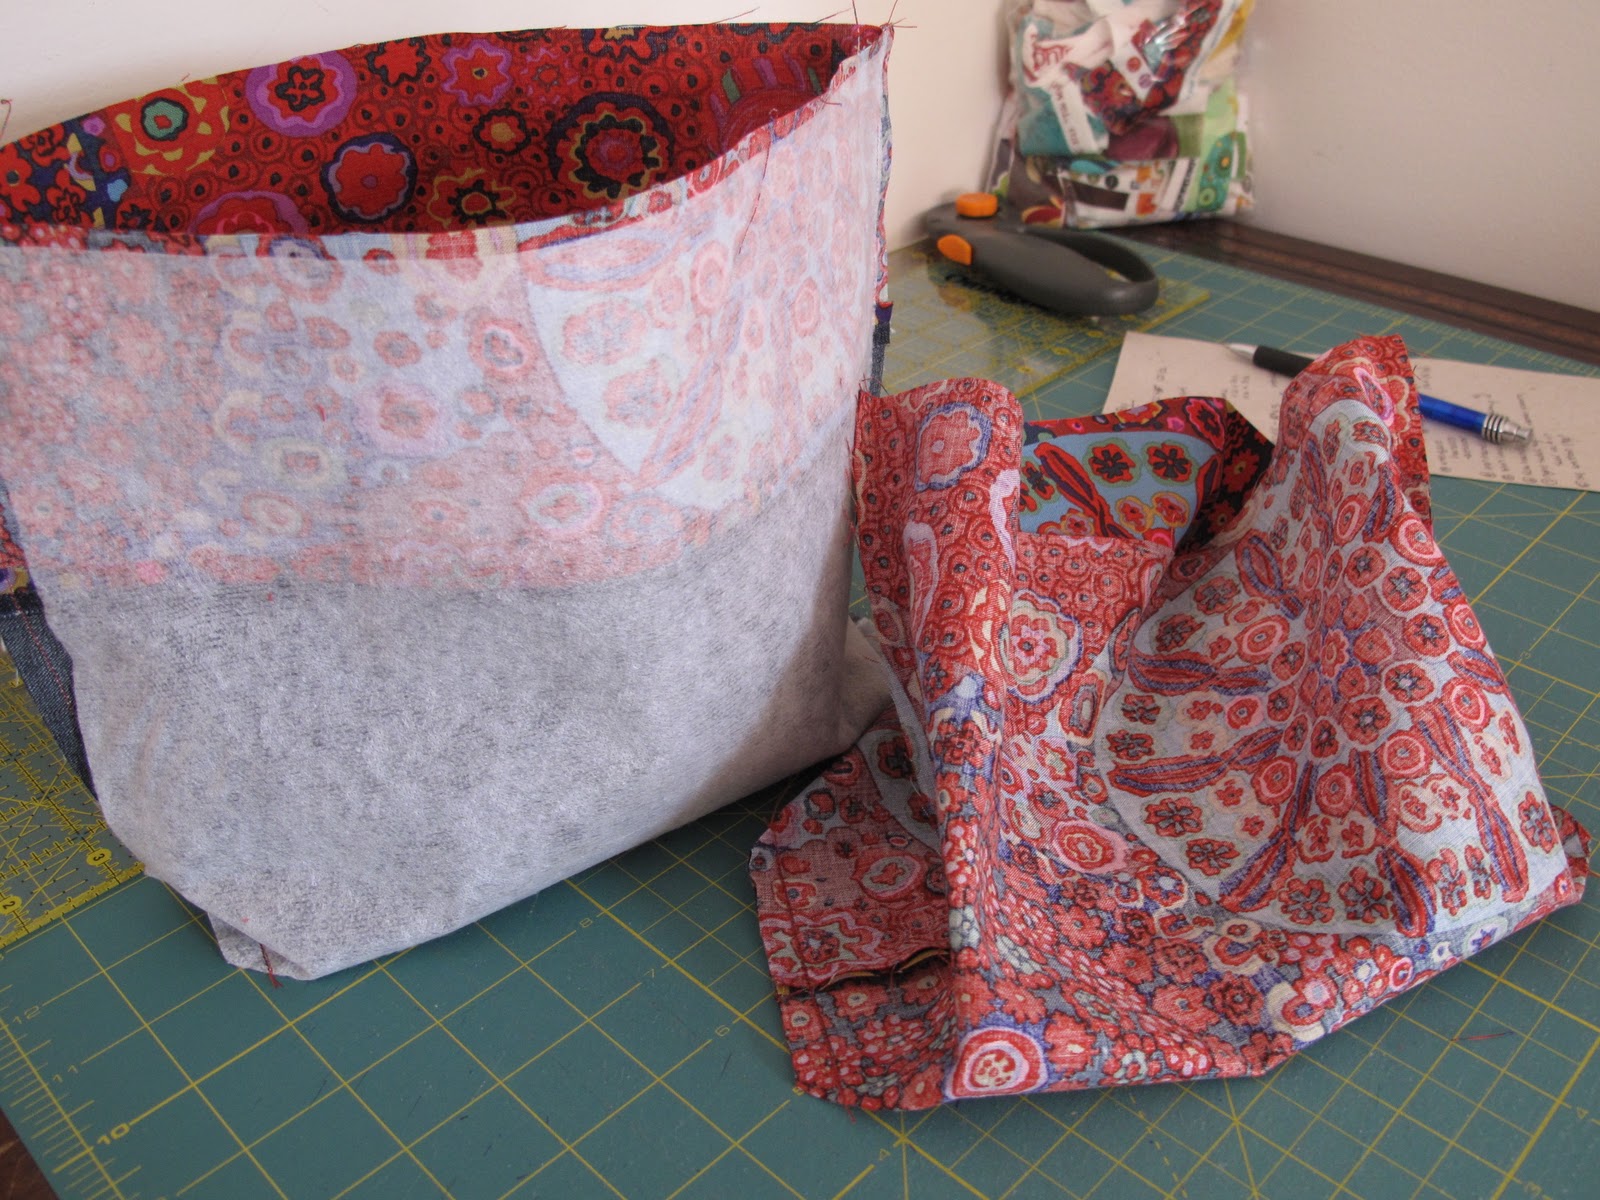
Sew the sides of both the exterior and lining. Leave the top open.

{6}
Box the bottoms of the bag exterior and lining. 
There are many ways to do this, so feel free to use our preferred method. I make 1.75" boxes by marking 1.75" in from each side, drawing a line, and then sewing along that line. (The pictures show you the triangle from the perspective of the side seam; because there is no bottom seam, I like to sew with the side seam visible. However, box your corners in whatever way you prefer.)

I sew along the line twice to make it sturdier. Once you've sewn along the line, trim the outer triangles off (cut about 1/4" from the sewn line).
You should now have a boxed exterior and a boxed lining.

{7}
Put the bag together.
Take the exterior bag, and mark the center and 1" away from the center on each side. These marks will help you place the handles. (Ignore the numbers below: measure your bag and mark its center.)


Turn the lining right side out. Place the lining right side out into the exterior (which should stll be wrong side out). In other words, place the lining in the exterior right sides together. Match the side seams and pin them.

Place your handles in the bag (between the exterior and lining). Make a "U" with the handle to ensure it won't be twisted.
 Use the marks you've made on the exterior as a guide. Put the inside edge of respective left and right side of the handle at the marks 1" offset from the center. Pin the handles in place and pin the rest of the bag exterior to the lining.
Sew the exterior, lining, and handles together using a 1/2" seam allowance. You'll need to leave a gap through which to turn the bag. I usually start right before a handle and end just beyond the seam, leaving a 2" or so gap (the picture may illustrate this better).

Pull the lining, exterior, and handles through the gap.

You should now have a bag (make sure to place the lining inside the exterior). You're almost done. I like to press the top edge of the bag before top-stitching the bag closed.


Top stitch the top edge with a 1/8" seam allowance (on my sewing machine, I use the opening in my regular 1/4" foot as a guide).


Trim the thread and you've got yourself a lovely loop bag!


Read more...

Tutorial: How to Transform a Framed Picture into a Corkboard

>> Sunday, June 14, 2009

Before:


After:


When I moved into my apartment, the black framed picture (see "before") was hanging in the kitchen. Having nothing immediately at hand to replace it, I left it perched above the stove. But I never liked it and the glass was already broken. When I painted my kitchen this spring, I decided it was time to repurpose the picture. I decided that Pain Francais would become a corkboard (see "after"). For under $10, you can do this too. [I'm sorry for the poor picture quality, this was a nighttime activity.]

Supplies
framed picture (or empty frame)
foam core board ($2.99)
1/4" cork (I bought a large piece for $2.99)
spray paint -- if you want to alter the frame color ($3.44)
utility knife
ruler/straight edge
glue
sawtooth picture hanger
hammer
scotch tape
packing or masking tape

Directions
1. Remove backing, image, and glass from your frame. Depending on the frame, you may need to cut off tape to do so (use your utility knife). If there is a cardboard backing, keep it. Also keep the image (or mat) for tracing purposes.


2. If you are going to paint the frame, take the frame and spray paint outside and paint it. Two coats should be sufficient. I transformed a black frame into a light yellow one and did not use primer. I recommend covering the area with newspaper or other paper/dropcloths.


3. While the paint dries, cut out foam core board and cork to the appropriate size. I used the image in the frame to get the most accurate piece. I taped the the image to the foam core board and used a metal ruler and utility knife to cut along 2 edges. I then did the same for the cork board.

[On the left, the already cut piece of foam core board, on the right, the image laid on the cork board prior to cutting).


It's wise to protect your cutting surface with either cardboard or a self-healing mat.

4. When the painted frame is dry, check to make sure that the foam core board and cork board shapes fit the frame.


5. Remove the foam and cork from the frame, and glue the cork to the foam board. Only the cork will be visible later, so it doesn't matter which side of the foam board is attached to the cork board. I used a paintbrush to spread modpodge evenly on the foam board before laying the cork on it. You may find that spray adhesive works just as well; I simply used materials already in my house. To facilitate attachment, lay heavy books on the foam/cork shape.

6. When the glue has dried, place the foam/cork shape into the frame, with the cork facing down (so it will be visible from the front). Make sure to wedge it in well, so it is flush with the edge of the frame.

If your picture had a piece of cardboard in, place, the cardboard on top of the foam core board. This should reach the edge of the frame. Carefully tape the cardboard to the edge of the frame. I used packing tape because I had it available, though masking tape or framers' brown paper masking tape might be better.

7. Decide which direction the frame will hang. If necessary, add a sawtooth picture hanger on the appropriate edge of the frame. Make sure to center it. I find it helpful to use a little scotch tape to hold the sawtooth piece in place while you nail it in.

8. Hang it up, add some pictures or mementos, and admire your handiwork!


The yellow-framed corkboard complements the other wall hangings in my study, such as this silk painting my parents brought me back from China (and they didn't know the wall color!):

A little closer:


And less exciting, but still rather nice, some framed paper:

My study is small, but has 4 white-trimmed windows. I love the deep purple and light yellow combination throughout the space -- or, rather, I love it almost as much as I adore the built-in, floor-to-ceiling bookshelves.

(This picture was taken about 9 months ago, the book collection has only grown.)

Read more...

  © Blogger template Autumn Leaves by Ourblogtemplates.com 2008

Back to TOP