Tutorial: Triangle-in-Triangle Blocks
>> Monday, February 27, 2012
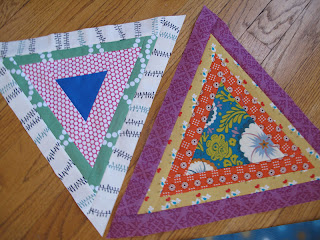
While pretty and full of potential, square-in-square blocks must occasionally give way to other polygons. It's the triangle's turn, and I'll be asking my fellow quilters-in-crime to make triangle-in-triangle blocks for do.Good Stitches in March. Although trendy rarely describes two.hippos' general ethos, it turns out I am quite fashionable this month as Lynne will also be debuting some (wonky) triangle-in-triangle blocks.
These blocks are pretty easy--dare I say straightforward--to make. Start with an equilateral triangle of whatever size you prefer, add a border of another fabric, rinse and repeat until you get to the desired size. I started with 4 triangles ranging from 3" to 6" and it took 4 rounds to reach 12.5" from a point to an edge (that is, the line bisecting the triangle, not the length of the triangle's edge).
This tutorial assumes basic sewing knowledge. It also assumes an ability and willingness to go with the flow since precise measurements are intentionally lacking. The amount of fabric you need will vary by a) the starting triangle and b) the width of the strips you attach to create the next triangle.
1.
Cut out some equilateral triangles. Quick geometry review: equilateral triangles have three sides all the same length (hence: equal) which means each corner has a 60 degree angle. I happen to own a plastic template, but you can easily make your own by drawing a triangle, printing one from your computer, or using your cutting board which may well have 60 degree angles marked. If you're cutting a triangle from a charm square, a 4.5" one is your best bet.
2.
Cut strips for to surround your triangle. They can be any width, though anything less than 1" may be a touch tricky the first time out. Make sure your strips extend beyond the points of the triangles. This is very important; otherwise you will not create a full triangle and will spend needless time ripping out seams. (Guess who did this the first time around?). I recommend erring on the side of lots to trim for trimming is far less time-consuming (albeit a little fabric-wasting) than seam-ripping and re-sewing.
3.
Sew the first strip to one edge of the triangle. See how the strip extends way beyond the points? That's good. Now press your seam (I press open, but you could press to one side).
4.
Now you can see why you need a strip longer than the triangle's edge! Line your ruler up with the triangle's edge and trim the newly added strip. Then trim the other side. All should be good.
5.
Sew a strip to the next side. It doesn't really matter which one, as the both options are adjacent to the already-sewn side, but you'll probably want to continue adding strips in the same order. I tend to add them counter-clockwise. Why, I have no idea.
6.
Trim it up. You could stop here if you just want to make some tents -- for a campsite quilt perhaps?
7.
Add the third strip and trim it up. At this point, you also want to "triangle" up the block. Apply the same principle as squaring up blocks: decide how wide the strip should be, measure from the edge of the inner triangle/row (e.g., place the 1.5" line on the seam between the blue and pink), and trim. Repeat for each side. This ensures, to the best of bias edges' existence, that your triangle will remain a triangle.
8.
Rinse and repeat. Err, start adding a new round of strips: sew, trim, sew, trim, sew, trim. Triangle-up. Do this as many times as you need to get the desired size you would like.
9.
Admire your finished triangles. (Note: these are very easy to chain-piece, so if you know you'll be making more than one, I recommend chain-piecing.) Contemplate how to sew them together.
10.
The end. Or a few postscripts.
a) you could add strips that are the same or different widths
b) contrasting widths can create cool effects
c) this is a great block for prints and solids
d) I'd love to see what you make
e) check back in April to see what I do with the dGS triangle blocks.


3 comments:
Very nice - I like your suggestions at the end, especially contrasting widths and combining prints and solids.
I love these. I am always looking for new ideas and I love the triangles. I also love the extra suggestions.
My seams end up wonky enough without adding bias into the mix so I can't see too many of these in my future. Having said that, I read all the way through this tutorial because I find your writing to be delightful!
Post a Comment