Batting & Basting

>> Wednesday, February 29, 2012

I keep scraps: fabric scraps, flannel scraps, batting scraps. I've become a little more ruthless over the years, only keeping scraps of a reasonable (to me) size and flannel/batting pieces that I could realistically use. I was ready to baste a quilt with what I thought was a sufficiently large piece o' batting, only to find out that it was a touch too slim. At which point I not only remembered my bag of batting pieces but also that it's possible to fuse batting pieces together. Well, fuse via sewing machine, not heat. That zig-zag stitch will nicely unite batting in a seam that needs no pressing and therefore has no extra bulk. It was super easy to do. And provided me with just the right size of batting.

At which point I moved onto basting. I am going to let you in on a big secret: I break all the rules of basting. I do not tape anything to the floor. In fact, if I'm basting a big quilt, I don't have enough floor space to lay everything out and keep it all smooth. So I've developed a trademark lazy two.hippos method (patent pending, of course). First I iron the batting and the backing. This gets everything all smooth and keeps the two pieces together (fabric "sticks" to batting as it is, this just gets it into place nicely). Then I lay it on the floor, sometimes draped partially over the area rug (bottom left) that has nowhere else to go. Then I place the top on the batting, arrange it just so, and pick a spot to start pinning. In the case above, I started from the side you can no longer see, opposite the end you can (does that make any sense?)

Depending on the design of the front and the back as well as how much extra room I have to work with (because, shhh, I don't always make the batting 2" wider and longer and the backing 4" wider and longer. Sometimes I do, and sometimes I don't), I start pinning from the middle or from a corner. (If you need the corner to stay just so, it's best to start there and work outward in a fan pattern). Then I start pinning. I purposefully don't tape anything so I can move things around and smooth out potential puckers as I work. I find this adaptive method much better than having things taped down and accidentally pinning puckers. It's not that no puckers ever form this way but rather that if and when they do, I'm more likely to feel them and fix them as I go. I will often reach under the quilt to feel and shift the backing. Much easier to do this when there's no tape in the way. And, when space (or lack thereof) demands it, I start rolling the quilt up to get the remainder of the quilt sitting evenly on the floor to finish. also, this creates a nice buffer for your knees, which usually want some cushion by this point in basting. I should note that rolling works only if you start pinning from one side rather than the middle.

And with that, happy leap day! I'm flying back to Michigan today. Woot.

Read more...

Tutorial: Triangle-in-Triangle Blocks

>> Monday, February 27, 2012

While pretty and full of potential, square-in-square blocks must occasionally give way to other polygons. It's the triangle's turn, and I'll be asking my fellow quilters-in-crime to make triangle-in-triangle blocks for do.Good Stitches in March. Although trendy rarely describes two.hippos' general ethos, it turns out I am quite fashionable this month as Lynne will also be debuting some (wonky) triangle-in-triangle blocks.

These blocks are pretty easy--dare I say straightforward--to make. Start with an equilateral triangle of whatever size you prefer, add a border of another fabric, rinse and repeat until you get to the desired size. I started with 4 triangles ranging from 3" to 6" and it took 4 rounds to reach 12.5" from a point to an edge (that is, the line bisecting the triangle, not the length of the triangle's edge). 

This tutorial assumes basic sewing knowledge. It also assumes an ability and willingness to go with the flow since precise measurements are intentionally lacking. The amount of fabric you need will vary by a) the starting triangle and b) the width of the strips you attach to create the next triangle.

1. 
Cut out some equilateral triangles. Quick geometry review: equilateral triangles have three sides all the same length (hence: equal) which means each corner has a 60 degree angle. I happen to own a plastic template, but you can easily make your own by drawing a triangle, printing one from your computer, or using your cutting board which may well have 60 degree angles marked. If you're cutting a triangle from a charm square, a 4.5" one is your best bet.

2. 
Cut strips for to surround your triangle. They can be any width, though anything less than 1" may be a touch tricky the first time out. Make sure your strips extend beyond the points of the triangles. This is very important; otherwise you will not create a full triangle and will spend needless time ripping out seams. (Guess who did this the first time around?). I recommend erring on the side of lots to trim for trimming is far less time-consuming (albeit a little fabric-wasting) than seam-ripping and re-sewing.

3. 
Sew the first strip to one edge of the triangle. See how the strip extends way beyond the points? That's good. Now press your seam (I press open, but you could press to one side).

4. 
Now you can see why you need a strip longer than the triangle's edge! Line your ruler up with the triangle's edge and trim the newly added strip. Then trim the other side. All should be good.


5. 
Sew a strip to the next side. It doesn't really matter which one, as the both options are adjacent to the already-sewn side, but you'll probably want to continue adding strips in the same order. I tend to add them counter-clockwise. Why, I have no idea.

6.
Trim it up. You could stop here if you just want to make some tents -- for a campsite quilt perhaps?

7.
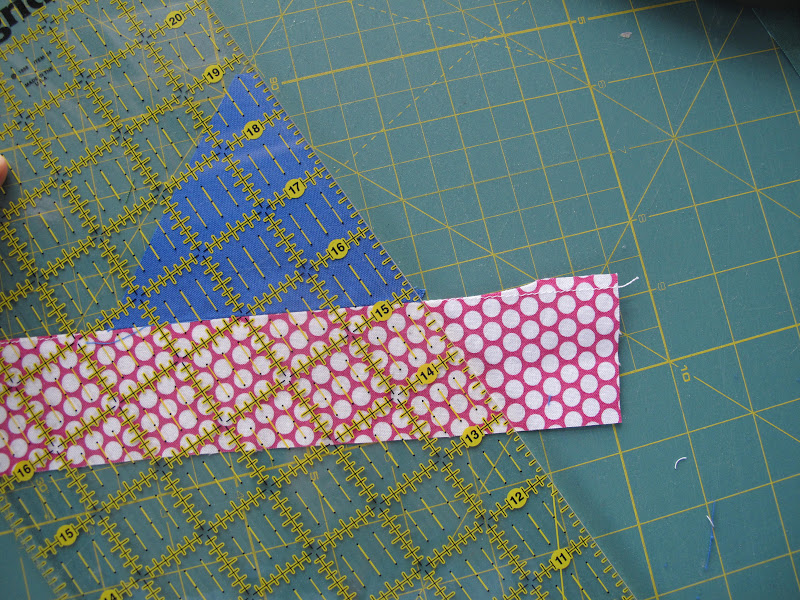
Add the third strip and trim it up. At this point, you also want to "triangle" up the block. Apply the same principle as squaring up blocks: decide how wide the strip should be, measure from the edge of the inner triangle/row (e.g., place the 1.5" line on the seam between the blue and pink), and trim. Repeat for each side. This ensures, to the best of bias edges' existence, that your triangle will remain a triangle.

8.
Rinse and repeat. Err, start adding a new round of strips: sew, trim, sew, trim, sew, trim. Triangle-up. Do this as many times as you need to get the desired size you would like.

9.
Admire your finished triangles. (Note: these are very easy to chain-piece, so if you know you'll be making more than one, I recommend chain-piecing.) Contemplate how to sew them together.

10.
The end. Or a few postscripts. 
a) you could add strips that are the same or different widths
b) contrasting widths can create cool effects
c) this is a great block for prints and solids
d) I'd love to see what you make
e) check back in April to see what I do with the dGS triangle blocks.

Read more...

Gentle Curves

>> Tuesday, February 21, 2012

Even I can be a delinquent student. The one who shrugs off an optional assignment as unnecessary. The one who figures "I've already done that" so why redo it. The one who prioritizes other things. In this case, the class is Rachel's Curves class and I confess that I waited until the "Rainbow Road" project to do anything more than watch the videos and read the project instructions. Because I don't need any bibs (though they would make a nice gift) and I had already made a scallop quilt, I passed on the first week of projects. Also, I was in Kansas sans sewing machine, which made it somewhat impossible to sew anything.

But I knew I would try my hand at improv curves and this project in particular. Never one to exactly follow instructions, I turned to my scrap bin instead of a rainbow of solids, and came up with this orange and aqua meandering path. I also started piecing the orange and aqua scraps together before the instructions were posted so I constructed each row a little differently, but to no ill effect. I think it's going to become a challah cover once I bind it (perhaps in a reddish-purple?). I also think it will be gifted to a friend, but that's a surprise for now.

This week's classes focus on precise curves -- which I really want to figure out. But I'm reclaiming the sewing slacker label for the next week as I'm off to Utah for research, sans sewing machine yet again. However, I am under the impression that there are amazing quilt shops on every corner of every street in Utah, so please point me to them! I'll be in Salt Lake City for the most part, with a possible day trip to Provo for some material held at BYU's library and special collections. Of course, restaurant, sight-seeing, and other recommendations are always welcome...

Read more...

Twirl

>> Monday, February 20, 2012

It's Michonne's month in do.Good Stitches, and she asked for Ribbon Blocks, with yellow stars and aqua ribbons. These blocks are going to create a lovely quilt. That said, making these blocks made me very happy that I came of quilting age in an era of modern quilting, because lots of little pieces that need to fit exactly into place would not have led me to prolific quilting (and the prolific fun that results from it). Now, these weren't difficult to make, they simply required a lot of instruction-checking and concentration. And much like I prefer to free-form it in the kitchen with recipes as a starting point (that adage about baking requiring precision is rubbish! Or at least only sort-of true: if you know what cake/brownie/cookie dough/bread batter should feel like, you can adapt), so too do I relish a certain imprecision at the sewing machine. But one of the benefits of do.Good Stitches is regularly moving outside the sewing comfort zone and that's a good thing, even if it lands me back in the comfort zone...

...of some improv log cabin blocks. Carrie asked for some volunteers to make blocks for a quilt for Avery, a young gymnast who recently fell and was paralyzed. As a former gymnast who has stayed somewhat involved in the sport (some coaching, some meet-directing, and now mostly spectating), this particular quilt project felt especially important, and these blocks were fun (and quick!) to make.

Read more...

Head.Paper.Fabric

>> Thursday, February 16, 2012

Exactly one month ago, I received an email detailing my For the Love of Solids partner assignment, which included her likes, dislikes, and swap desires. I clicked on her mosaic and wandered through her flickr favorites. I quickly knew exactly what I would do. The plan simmered for abut 30 days. With the exception of some minor color tweaks, the plan remained the same. In my head. Day after day, I would think about it, contemplate it, dissect it, diagram it, arrange it. In my head. The project took form, the puzzle pieces arranged themselves, the idea came into being. In my head.

Finally, it boiled over. I had to sketch it out, to attach numbers to proportions, to map and adjust the layout. Three pages of graph paper later, I was ready. Ready to cut, to manipulate, to piece. Ready to make templates, to draw angles, to add seam allowances, to create. And with the aid of my cutting mat and rulers, with pen and paper, I drew lines. And redrew them. And copied them. {Side note: when one's printer/scanner/copier is out of black ink, it is best to hit the "color copy" button if one wants said machine to spit out more than the blank page fed into to it minutes before.}

Several hours later, my FTLOS project was truly underway. Head.Paper.Fabric. All in one night.

Read more...

Slow to Bloom

>> Thursday, February 9, 2012

Heather was our fearless leader for January's round of do.Good Stitches. She provided us with instructions for blossom blocks, and we made them in a purples-and-pinks palette, with a background of coal. I admit that I'm a touch concerned that the Coal I bought is not actually Coal. It seemed darker than it should have been, but it was labeled Coal, so hopefully it's correct. Once I was home for more than 12 hours at a time (January was a little nutty with travel; February is somewhat similar), they came together quite quickly. I grabbed a picture of them on the steps of the Eisenhower Library before mailing them out earlier this week.

Michonne has asked for Ribbon Stars for February, and I've cut out all the pieces. Which places me way ahead of where I was a month ago for January's blocks. This suggests I should be able to crank them out before I leave for Utah at the end of February. Suggests being the operative word. What is no longer a suggestion but will be a reality is heading to Sarah's Fabrics in Lawrence tomorrow, where I'll not only get to see the amazingness many have raved about but also get to meet up with Mary Anne, who made me a set of fabulous placemats in the first round of the For the Love of Solids Swaps.

Read more...

Greetings from Abilene

>> Tuesday, February 7, 2012

It's amazing how quickly one can drive 20 miles of flat, isolated highway when the speed limit is 75 mph. I'm doing research at the Eisenhower Presidential Library this week, but staying about 20 miles away from Abilene in Junction City. What would be an annoying slog in any metropolitan area is no big deal in the fairly rural Kansas plains. The library/museum complex is a half-century old, and its architecture certainly conveys a mid-century modern look. I haven't been to the museum yet, but as a researcher I do get free admission. Perhaps on today's lunch break.

Abilene may be small, but it seems to have 2 quilt shops. One was closed yesterday and I couldn't find the other but I'm going to try again today. I was lucky enough to win a spot in Rachel's Curves class, and since I can't sew anything this week, perusing fabric after a day's work will have to suffice. If I'm efficient enough this week, I'm hoping to have a little time to stop by Lawrence and/or explore Kansas City on Friday before I fly out. Any suggestions for things to do or see while along the eastern Kansas portion of the I-70 corridor are welcome!

Read more...

  © Blogger template Autumn Leaves by Ourblogtemplates.com 2008

Back to TOP