New Bag for the New Year

>> Wednesday, September 28, 2011

I was lucky enough to be able to test Rae's new Showoff Bag pattern this weekend. This is super bag: big, roomy, fun, and straightforward to put together. This is the first time I've had the honor of testing a pattern and, I must say, it totally appeals to my sewer + editor side. Sometimes, when I'm not sewing or working on my own work, I do some freelance editing. And I really like it. Since pattern testing combines sewing and editing, I was a pretty content person this weekend.


This also gave me a chance to use this lovely piece of home dec weight fabric I've had in my stash for a while. It's from Joel Dewberry's Ginseng collection and I bought it on sale several years ago and have been waiting for the perfect opportunity to use it. Since the pattern uses a half-yard of fabric on the exterior, this was the time. I used dark denim for the top panels and handles, also from my stash.


For the interior, I opted for some coordinating Curio Grunge in Butternut (by Moda). I had enough fabric left over from the exterior to add a matching pocket, and I remembered to add my label before putting the bag together. (This might be an obvious step, but I tend to forget it). Rae will be making the pattern available, both for personal use and with a seller's license soon. If you'd like to try your hand at winning a copy of the pattern, head over to Emily's blog and enter here (and drool at her amazing cakes, so awesome!).

Edited to add: The bag pattern is now available here.

And with that, I'm off to cook some more...Rosh Hashanah, the Jewish New Year, begins tonight. To those who celebrate it: shana tova u'metukah (a good & sweet new year). Or just pretend your new year starts tonight, and have a good & sweet new year as well (eat some apples and honey while you're at it).

Read more...

Late to the Party

>> Monday, September 26, 2011

But fashionably late, I think.

Anna posted a tutorial for a gathered clutch over a year and a half ago. I dutifully bookmarked it, and then shied away from it because of the zipper. Because zippers are supposed to be terrifying. But having finally conquered the zipper (it's really not that bad), I felt it was time to make one of these pretties.

Since it's a clutch and therefore small, it really doesn't require much fabric. And several of the Terrain scraps I received from Kate Spain were big enough to use. I wasn't sure how some of the more straight-edged geometric prints would fare if gathered (though now I think the answer is: ok) so  opted for the orange tone-on-tone as a pretty safe choice.

I added the credit card pockets but didn't include a divider. I think next time (and there will be a next time) I'll add the divider. I might also interface the lining. I think even a little lightweight fusible interfacing would make it a touch stronger and, actually, a little easier to sew together.

Read more...

Immune No More

>> Friday, September 23, 2011

Drunkard's Path QAL

I've generally willed myself away from quilt-alongs. Not because I don't like the concept or don't want to quilt with (virtual) friends or don't want to make another quilt. Mostly, I bookmark them and note keep the instructions accessible so, if at some point in time, it's what I want to make and I have the time, I can. But I think I might actually do one. Kate and Kristie are doing a drunkard's path quilt-along, and I have really wanted to make some drunkard's path blocks for a while now. Kate's amazing quilt cemented my interest in the block and the design possibilities it offers. Of course, the timing isn't quite perfect, but I think I can make it work. Or not....to be determined. But I will figure out curved piecing this fall, one way or another.

In other quilting news, I'm the host, or as a friend dubbed me "Chief Quiltress," of a new do.Good Stitches circle. Hosting comes with organizational responsibilities (very appealing to my spreadsheet-loving mind), but also gave me the opportunity to select the charity to which we'll donate quilts. I'm excited that our new Empower Circle will be sending quilts to Alternatives for Girls, a really wonderful organization that does outreach, offers mentoring, and provides shelter to teenage girls in Detroit. I'll be leading off in October, and I need to decide/finalize the block I'll ask the circle to make. I'm toying with a few ideas, but if you have any suggestions, I'm all ears!

Read more...

The Epitome of Awesome

>> Wednesday, September 21, 2011

The epitome of personal awesome? That would be Michelle, who, out-of-the-blue, sent me this awesome fiestaware lemongrass mug and tangerine bowl. I mean, I might have mentioned a love for fiestaware a couple posts ago. And I might have said that one could send me some to live in my (no longer) fiestaware-free kitchen. But I didn't expect anyone to actually listen or do anything about it. And yet Michelle did. She told me something was headed my way, but I had no idea what that would be. And then thus huge, but pretty light, box from Amazon showed up. And in it was this fabulous surprise. I'm not sure I can convey how much I love surprise, out-of-nowhere, unexpected gifts of the exact sort of thing I really like. But I'm trying....so thank you, Michelle. You're the best!

The epitome of public awesome? That would be Tiya Miles, who won a 2011 MacArthur Foundation "Genius" grant. I highly encourage anyone who likes reading history to read her books, Ties That Bind: The Story of an Afro-Cherokee Family in Slavery and Freedom and The House on Diamond Hill: A Cherokee Plantation Story. She's a wonderful writer and excellent historian, but, most importantly, she is one of the nicest, kindest, most optimistic, and supportive people I've ever met. And I admit, I've only had one conversation with her. But it was transformative. Moreover, in addition to being an incredible scholar, teacher, and person, she also founded ECOGirls, a mentoring and empowering program that connects girls to the local environment.

Awesome people all around. Pretty cool.

Read more...

Back as Front

>> Tuesday, September 20, 2011

After making a lot of quilts, I've often found that I love the pieced backs as much (or even more) than the front. I wanted a quick project on Sunday, and put together this baby quilt with the mantra "back as front," or think about the design as a quilt back. I think it works. It's one quilt I'll be contributing to Kate's 100 Quilts for Kids project.

The quilt actually started with the back, or rather my decision to piece together several fleece remnants to make this back. I'm trying to sew from my stash and part of that means using the odds and ends of backing and battings/flannel in my project. I used to use fleece as a backing frequently, and while I no long use it that much, I still think it makes for a great, warm, soft, and cuddly quilt. Perfect for a kid in Michigan.

I quilted it using a simple cross-hatch design. After basting the quilt, I placed masking tape on the quilt using the space between the big dots on the black and white dot fabric as a guide. I then stitched on both sides of the masking tape, using my presser foot's edge as a guide. I probably should have used my walking foot, but I was lazy and didn't want to take the minute to switch feet. My hands had to work a little harder, but aside from that, it was fine.

The binding came from my leftover stash of black and white fabrics from my sister's wedding quilt. I do love the black/white/red/yellow combination -- I think it works for any gender, any age. It's so versatile. I've been looking for a totally local -- as in, I can drop this off -- place to donate this, but if I can't find one, I'll be sending this to Margaret's Hope Chest. They're in Michigan, so it's somewhat local, and they do an incredible service by distributing quilts to kids whose parents are in prison. I can't do full justice to their story of origins, but suffice it to say, it's one of the most compassionate responses to violence and tragedy that I've encountered.

Shadows: A little outtake from this morning's photo shoot. 

Up on my pedestal for a moment: This quilt, which is admittedly quite simple, took about 6.5 hours from start to finish. That's barely an hour a day if spread over a week. So grab some strips of fabrics and make a quilt. Kate's even offering some incentives for quilts made over the next month. If you've got access to some fabric and a sewing machine, you can do it. There will be a link-up on Kate's blog, next week, September 28-30, as well as October 12-14.

Read more...

Perfect Placemats

>> Saturday, September 17, 2011

I admit it. I've spent the past couple of days eagerly checking the mailbox to see if my For the Love of Solids package had arrived. It looked like almost everyone shipped in time, so it could have arrived anytime this past week. Today I was home when the mail carrier came, but I was talking to my roommate and managed not to duck outside in the middle of our conversation. But a little later, I checked outside and there was a nice box waiting for me. And inside the box was a fantastic set of goodies from my partner, Mary Anne. When she posted these on flickr, I commented on how much I liked the dark teal color (Kona Glacier for those keeping track at home). It's hanging out on the top of my favorite colors list with Betty's Orange. My neighbors painted the formerly forest green part of their house dark teal, and I love staring at it. Handily, it seems to be a very in color this fall, so I get to marvel at it a lot.

The placemats include a pieced section on the left, comprised of Moda Crossweaves. They are shimmery and fun and feel great. The quilting on these placemats is lovely as well -- an inner border on each of the rectangles of the pieced section and straight-line quilting on the rest of the placemat. As the first picture shows, the backs are made of light lime and a pieced section as well.

Mary Anne also included 4 coordinating napkins, made out of Turquoise and Light Lime. The hems on these napkins are gorgeous. I keep thinking about making cloth napkins for myself and then stop when I start thinking about all that hemming (strangely, I'd rather bind than hem. It makes no sense, I know.)

And here's everything all together. Mary Anne also included 2 fat quarters, of Kona Glacier and Moda Dill (one of my new favorites, I'm sort of on a green kick of late, though I haven't done much with it yet) as well as 2 bars of Lindt chocolate. On flickr, she asked about chocolate preferences and I responded (not knowing that she was my partner) that I love white and milk chocolate. When she posted a picture of everything she was sending and I could see that it included white chocolate, I was hoping that the package might wind its way to me. And it did. And this pleases me greatly. Thank you, Mary Anne!

Read more...

Friday Recipe: {Vegetarian} Tortilla Soup

>> Friday, September 16, 2011


It's been quite a while since I posted a recipe, but the combination of sale tomatoes, early frost, and a friendly request leads me to post the recipe for my favorite soup of all times. Seriously, I could eat this every day. And if tomatoes were always bountiful and cheap, then I probably would make it every day. I got this recipe from a friend whose family had adapted a non-vegetarian version (tortilla soup frequently has chicken broth and chicken in it) into a vegetarian version. It's awesome. Go forth and make it. And eat. Often.

{Vegetarian} Tortilla Soup
Serves 8-10

Ingredients
Olive Oil
2 12-inch tortillas (I usually use whole-wheat but use what you like)
1/2 large white onion, chopped (sometimes I use a whole medium yellow onion)
3+ Tbsp fresh garlic, pressed
2 lbs. frozen baby white corn (white corn is key)
3 lbs roma tomatoes
1 can tomato paste
1+ Tbsp cumin
1+ Tbsp kosher salt
1/4 tsp ground white pepper (I've used black pepper in a pinch)
Few dashes of cayenne pepper
4 c. vegetable broth or water + pareve/fake chicken soup mix

Optional Garnishes
Grated cheddar cheese
Blue corn tortilla chips
Cilantro

Instructions
1. Rip tortillas into small pieces and, in a large soup pot over medium-high heat, fry tortilla pieces in thin layer of olive oil.

2. Add onion and saute until translucent (or you can start with the onion and add the tortilla pieces).

3. Add garlic.

4. After the garlic is lightly cooked, add all the other ingredients EXCEPT 1/2 corn (i.e., add only 1 lb).

5. Bring the soup to a low boil and boil for about 5 minutes.

6. Turn off heat and, using an immersion blender, puree the soup. It should be thick, but not chunky. (If you don't have an immersion blender, you can do this in a regular blender but make sure the soup has cooled sufficiently.)

7. Add the remaining corn and return to the soup to a low boil. Simmer without burning the bottom (stir occasionally).

8. Eat! And eat some more. Optional Garnishes include shredded cheddar cheese, blue tortilla chips, cilantro, or anything else you'd like.

*I do love fiestaware. One day I might even have some in my kitchen. Feel free to send me some if you want.

Read more...

A Giant Hug

>> Monday, September 12, 2011

Sometimes words aren't enough. Jenny is one of those friends who always knows and finds the right thing to do in any given situation. When we first met, she had ginormous bruises all over from a bike accident, but still convinced me that getting a road bike and riding a metric century the next day was obviously the best possible thing to do (she was right). She's exactly who you want motivating you on a bike ride or a run or even floating down a river. She combines outrageous, serious, and sentimental in the best possible way. She's an expert card-sender, for example, and made sure to leave and mail me several cards when I left Madison and was adjusting to a new life in Michigan. We were lucky enough to overlap in New York for part of the early summer and share a few glasses of wine and some meals.

Yesterday, Jenny flew to Geneva. She'll be there for the academic year, working on her dissertation. As exciting as this opportunity is, it also meant uprooting her life, leaving her partner, her friends, her family, her bikes, her daily routines, her apartment, and so on. And this is hard. Last weekend I realized I needed to make her a quilt. Something to take with her as a visceral, daily reminder of friends and her life here. And something to remind her of her promise to name an Alp after me. That's the real reason I made this quilt.

Given that this would need to be mailed by Tuesday to ensure it reached her before she got on a plane, this had to come together quickly. Luckily, I had just seen (a different) Jeni's Giant Vintage Star Quilt, for which she had handily posted a tutorial. Inspired by barn quilts--so appropriate for a quilt for someone who lives biking through rural Wisconsin--this quilt is one giant block, which makes it come together quite easily. At 67" x 67", it's a great size--perfect for reading under or covering a full bed--but a little challenging to photograph well.

Although Jeni's vintage version uses a rainbow of fabric, I've been fascinated by the diamond windmill shapes that form with two colors (actually I've been thinking of just making some single diamond windmill blocks -- as in, the shape the orange or the blue makes on its own), so two colors it would be. It also made the math really simple: this quilt used 4 yards of fabric on the front, 2 yards of gray, one each of blue and orange. Only after I picked the fabrics did I realize how apt they were: the orange comes from Paula Pass' Flights of Fancy line and the blue from Kate Spain's Central Park line, and Jenny would be flying to Switzerland from New York, where she spent the summer.

I pieced the back with darker versions of orange (a fun pindot fabric I had) and blue (from Denyse Schmidt's line for JoAnn's) as well as the gray bicycle print (from Erin McMorris' Weekends collection). Originally I planned to run into the store to buy some more gray for the back, but I saw the DS Quilts bolts and realized the blue acorn print would be perfect (I also ran into Emily who nabbed the bolt after I was done with it). I thought about straight-line or echo quilting, but give the time constraints, I opted for free-motion squiggles.Which went quickly once I got my machine re-accustomed to free-motion quilting. And had it not been 11 pm, I might have gone out and purchased quilting gloves since the nice smooth fabric meant my hands were slipping a lot. Instead I worked on being patient and quilting calmly, or something like that.

As soon as I picked the orange and blue fabrics, I knew I wanted to use this green Dena Designs print for the binding. I love this print and love it even more as binding. I'd stock up on more of it if I could find it. I shipped the quilt to Jenny on Tuesday and it arrived on Friday, just in time to get packed.

In the process of making this quilt, I realized that there is something magical about quick, big quilts. I transformed a few cuts of fabric into a quilt that I know will be used and loved in a matter of days. In contrast, I've spent almost a year trying to figure out what quilt to make another friend of mine. It's long overdue at this point, and the primary reason is that I could never settle on the perfect design or the ideal fabric. I worried that some ideas were too simple, some not special enough, and others just not right. And then I made this quilt and realized none of those concerns matter (real perceptive, I know). In the vein of this confessional post, I just need to plunge in and make things and worry less about whether something will be special enough. So thank you, Jenny, for giving me the chance to realize this, obvious as it may be.

Read more...

The Whole Watermelon

>> Thursday, September 8, 2011

Last week I showed a "slice" of my solids swap quilt, and now I can show the whole thing. While I finished it a few days ago, the weather has been most uncooperative for getting decent pictures. But I finally found a door that receives enough light on a grey, rainy day to snap a few photos.

After I created the improv quilt, I opted to add a little more wonkiness via circles. Dan's quilt definitely provided the inspiration, though in the spirit of improv + wonky, I wanted the circles to be not quite a perfect 360. Luckily, that was pretty easy to achieve! The innermost circle consists of alternating strips of my partner's favorite colors.

To balance the pieced circles, I also quilted in circles. This might be my new favorite quilting design, and a cardboard circle template was my best tool: I cut out a circle (after tracing a glass onto a piece of cardboard) and taped the cardboard onto the quilt sandwich. Then I placed my presser foot against the cardboard and basically "traced" the circle while stitching. After that, I moved outward at regular intervals and continued to use the previous circle as my guide.

The back -- which again uses my partner's favorite colors -- shows off the circle quilting really well. The empty circle in the middle will become the label, but I didn't want to write my partner's name before taking pictures.

This palette is not my regular go-to sort of color scheme, but I'm confident my partner will be happy with it, and it's fun to play with colors that I don't usually use.

The black binding was not originally planned, but once I used it in the pieced circle, I knew it was the perfect way to frame the mini-quilt. I'm really happy with how it works as the binding; it stands out from the rest of the quilt and creates a clear border. I think it helps focus the improv/wonky piecing in a visually pleasing sort of way. I'll send this mini-quilt, the pouch, and some other little goodies off to my partner tomorrow.

Read more...
Nowhere and Everywhere

>> Tuesday, September 6, 2011

Awhile back, I mentioned ordering labels. I talked about it but never showed anything because I ordered them while living like a vagabond and never managed to take pictures of them on the rare occasions in which we were in the same place at the same time. My weekend projects included a large quilt to which I wanted to attach a label. Thus ensued the label hunt. I knew I had stashed the small roll in a "safe place" while moving to ensure that they returned with me. But that "safe place" eluded me.

I hadn't come across them while unpacking and I dug through my sewing stuff multiple times in pursuit. In between each stage of quilt-making -- after piecing the front, piecing the back, and basting the quilt -- I looked for the labels, hoping to be able to attach one before quilting. But no, I couldn't find the roll. I quilted and label-hunted, binded and label-hunted, to no avail. I washed the quilt and I hunted, no luck. I dried the quilt and I hunted and, finally, at last, the labels appeared. I had squired them away in an envelope full of "important" papers that I would surely sort and file quickly (ha!). So the timing was imperfect, but at least I could still sew on a label before shipping the quilt. And so I did. The hand-stitching is imperfect, but I'll take it. And if you're looking for labels, Michelle at Inked Papers is delightful.

Read more...

A Little Zipper Action

>> Saturday, September 3, 2011

It's true. Before today, I had never sewn a zipper. As I've been sewing more bags, I found this state of affairs more problematic and limiting. I read blogs and tutorials, half of which indicated zippers are hard and half of which suggested that zippers are pretty easy. All in all, I'd say the first time around went smoothly, and wasn't too difficult. Whew.

I made this pouch for my partner in the solids swap (it's stuffed with solid (+ a couple print) scraps). I used this tutorial from kelbysews, with a couple of modifications. I cut pieces 7" x 8.5" to make a slightly larger pouch. I used lightweight interfacing on the interior lining fabric and some slightly heavier interfacing on the exterior fabric (I didn't have any medium-weight at home, but this combo worked well for me). I like the addition of tabs for the zipper ends, but I would start with a wider piece of fabric to create a little more wiggle room when sewing everything together. I like the simple 2-fabric pouch I made, but if I make it again, I might add a little ric-rac or trim. All inall, a productive sewing morning.

Read more...

Watermelon Slice

>> Friday, September 2, 2011

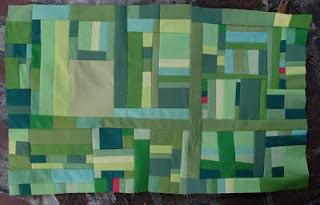
My partner's favorite colors: check.
Improvisational: check
Somewhat wonky: check.

My plan for my partner's solid swap item changed a lot in my head. Working off her mosaic, I came up with several ideas. But none of them felt right. Then I was looking through some of my Flickr favorites and came up with a new plan. The pieced piece above represents the start of that plan.

I always forget that wonky/improv piecing almost always takes longer than planned piecing. This step took most of yesterday to cut, sew, and press, and it's about 15" x 27". There's another little surprise to come, but as I worked on it, I dubbed it "watermelon slice" because of the varied greens with a tiny pop of raspberry pink. Plenty more work to do before the deadline, but it's taking shape and I think the remaining steps will be quicker.

Read more...

  © Blogger template Autumn Leaves by Ourblogtemplates.com 2008

Back to TOP