Sebastian, Literally

>> Sunday, December 30, 2012


Barring some radical shifts in the US population's naming preferences, my name is never going to crack the top 1000 baby names, as measured by the Social Security Name Database (a fascinating dataset, for those statistically inclined or trend curious). Which I rather like. At least now -- there was the crushing childhood realization that I would never find my name plastered on magnets or keychains or the like (which my siblings could, in fact, purchase). But I've recovered from that discovery and rather enjoy possessing an unusual (in the US) name, even if it sometimes causes pronunciation consternation (in others; I know how to say my name, though some native Hebrew speakers might dispute my Americanized version) and gender confusion (theoretically this could be explained by the fact that my name in Hindi denotes a male, but somehow I don't think that's why I get emails sent to Mr...).


Sebastian, in contrast, has enjoyed a popularity curve worthy of a roller coast ride. One hundred years ago, it rested at 567, but by 1950, it fell out of the top 1000 names. A decade later, it poked its way back in, and then, for about a quarter century, toggled between the mid-700s and the mid-500s. By 1986, it started its upward climb and, at the turn of the 21st century, it jumped into the top 100. For the past 2 years, Sebastian has rested comfortably as the 68th most popular boy's name in the US. But when asked to make a quilt for a baby named Sebastian, I knew nothing of this history.


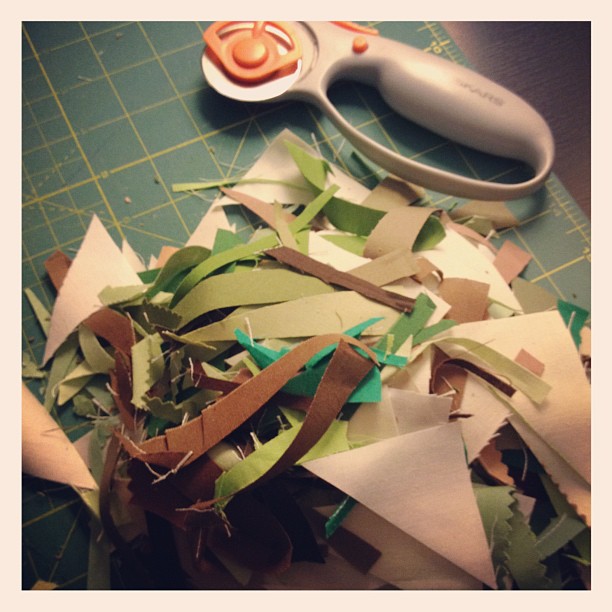
I simply knew that the baby was named for a family friend's deceased father and they wanted a quilt that reflected this meaningful name choice. I chose to be literal, and I made the name the visual centerpiece of the quilt. I paper-pieced the letters (3"x4") from templates I made (inspired by these). The "a" turned out to be my favorite, though whether that's because of the shape or the fabrics used, I'm not sure. I used blues and greens from my scrap bin and stash, and arrayed the letters on a dark-light-dark spectrum, all set against Kona Mustard.


To add some visual interest, I pieced some squares and rectangles together, and added them above Sebastian. As is my habit, I improvised as I pieced -- adding, trimming, debating, selecting, rejecting (aka seam-ripping), and adding some more. The crinkling derives from unevenly spaced straight-line quilting. The back of the quilt is Michael Miller flannel (Zoology in Sea), which is delightfully soft. Whether or not Sebastian has made its way on to magnets and keychains, but this Sebastian has at least one thing with his name labeled with his name.

Read more...

A Little Spice

>> Thursday, December 27, 2012


Sometimes the closet provides the perfect upcycled wrapping. Because a warm, flannel-backed quilt might just save you 10 percent on your heating bills this winter. I finished this quilt right before I went home for Thanksgiving, and I wanted to make sure it stayed protected in transit. That, and I needed to deliver it to the person who commissioned it as a wedding gift, and I thought she'd enjoy the temporary wrapping.


I showed a few glimpses of the quilt in progress way back when I started it. As noted then, the design is based on Felicity's lovely Sea Glass on Sand, and based on her (and other feedback) I added in a couple of mulberry triangles to pop against the browns, greens, and creams. The colors, along with the seasonal scents they evoke and the occasion for the quilt, led me to dub it "A Little Spice" as I constructed it; the name stuck. The color scheme is a little different from my typical choices, but it was designed for the couple whose apartment is decorated in creams with green and brown accents. Working out of my color comfort zone pushed me to think about design, and how a quilt could sing in a more muted palette.


I love how the bright white draws the eye in as much as the greens and darker tans. The blocks were all 6" and I originally planned a 10x12 layout, I added an extra row to make it 10x13 (or 55"x71.5") as I pieced it together. The seam allowance ate up the 1/2" between rows and while I knew that would happen, I felt a need to compensate. Or at least make sure there would be room for the couple's toes. I borrowed the quilting plan from Felicity as well, using 2 interlocking curves on the diagonal -- a technique I'll certainly use again.


The quilt commission came with a request for a "soft back," and I opted for flannel. A flannel sheet from Target to be specific. The sheet is thicker than quilting flannel, so that plus a layer of batting makes for a substantial throw quilt. Using a sheet also eliminated the need to piece the back and, as it was bigger than the front, simplified basting as well. The binding is a Heather Ross print, Meadow Flowers, I picked up in the sale vault at Lake Street Mercantile about 4 years ago. Apparently I could have sold that yard for about $36 right now (admittedly, it's no goldfish), but I'm content to let aesthetic value trump financial gain. Plus, if someone had purchased it, I would have had to go to the post office between Thanksgiving and Christmas, and that surely represents a terrible use of time.

Read more...

Good & Plenty

>> Tuesday, December 4, 2012


Or Mike & Ikes, because, to be honest, I hate licorice and bubble-gum pink, which places Good & Plenty's pretty low on my candy consumption list. So low that I don't think I've tasted a Good & Plenty in decades, if not longer. But candy, delightful as it can be (when it's tasty and all), is not actually the point of this post. (Shocking, right?)


I'm really hoping that this quilt made it to its new home. I haven't heard and, as luck would have it, I sent it on its merry way to New York City two days before Sandy unleashed chaos on the region. Priority Mail, I'm guessing, did not operate quite as quickly as usual in the aftermath of a damaging storm. And I didn't put a tracking number on it because apparently I like to test fate. If nothing else, I'm recording its existence here.


I really like the quilts I make. But this one? This quilt I love. The idea popped into my head and, despite some unfortunate moments with the seam ripper, it came into being before exasperation set it. Each Good & Plenty orb uses a large rectangle plus 4 drunkard's block pieces, and I think it might be more efficient and precise to use half-circle blocks, but that's an experiment waiting in the wings. I can imagine all sorts of other color combinations and layouts with these blocks, but I do love them in solids. Some of my favorite solids to be precise -- Betty's Orange, Charcoal, a beguiling aqua whose name I don't know, Gray, and a charming yellow whose name likewise escapes me. They're either Moda Bella Solids or Kona, and the background cream is Moda Snow.


I got all fancy with the orb-quilting, using coordinating thread, a free-motion foot, and a different technique (most of which were new to me) in each color. There are pebbles. There are loops. There are squiggles. And there viney leaves. Viney leaves, people. Those were new and tricky and challenging, and I have no idea how people quilt more of the them in larger spaces on their home machines. I hear there's this thing called practice, but still, that's some hard quilting.


As has been my wont this fall, I pieced a backing from stash fabrics. A half-yard here, a whole yard there, and random pieces in between. I'm making a slight dent in the piles, and I love displaying some larger swaths. Cute as those elephants are, it's the repeat in the orange fabric that pleases me most.


As always, Good & Plenty is machine-bound. I got a little fancy here, using aqua thread on the charcoal binding for a little twist. It's only visible close-up, but it adds a little solid sparkle to the edges.

Read more...

SMS Giveaway Day!

>> Monday, December 3, 2012


Right before Labor Day, I began making clutches. There's nothing like a friend's request to jumpstart new projects, especially when the requests are doable in a short amount of time. For SMS Giveaway Day, I'm offering one (1) clutch to a random winner -- the choice of blue or pink is yours. It's also cool to enter to win it for a friend; the choice of color remains in your control, unless you'd prefer that I make a choice for a person I don't (think I) know.


Here's a little peek at the interiors, which showcase different fabrics, include a magnetic snap, and contain a divider (an invisible surprise!).

To enter the giveaway, please leave a comment on this post.

The fine print:
*One comment (entry) per person. Please make sure I can contact you by email.
*This giveaway is open to everyone, wherever you live in the world.
*The giveaway will remain open until Friday, December 7 at 8 pm EST (or thereabouts!).
*The winner will be selected randomly.

ETA: The giveaway is now closed, and random magic picked #145: CraftyGirl83.

Read more...

Tonight: A2MQG Show & Sale

>> Thursday, November 15, 2012


For anyone in SE Michigan, NW Ohio, or the Windsor, ON area: the Ann Arbor Modern Quilt Guild Show & Sale is tonight at the Corner Brewery. Join us! In addition to quilts, there will be additional handmade items -- great for holiday, birthday, wedding, graduation, just-because gifts...

More on the quilt above soon!

Read more...

Scattered Color Pop (Mini Tutorial Included)

>> Tuesday, November 13, 2012


There's nothing like a quilt show & sale to make quilt tops jump off the shelf and get themselves backed, quilted, and bound. I might have played a little role in this process, but the importance of deadlines in my life cannot be overstated. I made this quilt top last winter, after which I dallied finishing it. Most of my sewing projects arise with a recipient in mind, whereas this one started with an idea and no recipient, which is where the no deadline issue arose. But finished it is. And love it I do.


A few people asked me about size, fabric requirements, and the like so I'm going to provide a mini-pattern-tutorial. As half-square triangles represent the entirety of the block-making, and the layout is random, I'm really only providing some numbers and measurements. This particular version finishes at about 54" x 58.5" (12 rows, 13 columns), but it's super easy to upsize or downsize: make more (or fewer) blocks. In other words, figure out the dimensions (rows/columns), multiply, and the product = necessary HST blocks.

Supplies
1 charm pack (42 5" squares)
25" of 3 coordinating solids, cross-cut in 5" WOF strips

Cut 5" strips into 38 5" squares (if you cut all the strips, you'll have 40 squares of each solid. You could use 40 each of 2 solids and 34 of another, thus only requiring 4.5 5" strips on one color (if, say, you have solid scraps and not quite 25" of one). I think I used 42 5" squares of the off-white and khaki, and 30 of the gold, but I can't recall and I'm too lazy to count HSTs in the quilt itself. The point is: this is a versatile, flexible design. Use what you have!

Divvy up each group of squares into thirds. You should have 12 piles. As 38 does not divide evenly into 3, the groups won't be the same size. Then pair up the piles as follows (substituting whatever colors you're using): (1) charms/off-white, (2) charms/khaki, (3) charms/gold, (4) off-white/khaki, (5) off-white/gold, and (6) gold/khaki. Make sure each pile consists of full pairs. The piles with the charms should have 14 charm/solid pairs, while the solid-solid piles will vary depending on how you divided 38.

Sew squares into half-square triangles, using your preferred method. I draw a diagonal line down the center, stitch a scant 1/4" on both sides, cut on the line, and voila, 2 HSTs ready to be pressed. Trim your blocks. With 5" starting squares, I usually trim down to 4 5/8" but you might be able to eek out 4.75" or prefer to play it safe with 4.5".

Lay it out -- I start by grabbing squares randomly and then rearranging to get a reasonable distribution of color. In the end, it is not random in the mathematical sense, but visually it feels random. Sew it up. Take a break, have a drink, eat a treat, and admire your lovely quilt top.


Since this quilt is now finished, it has a back too. I pretty much adore this quilt back. It's got bright colors, birds in cages, ugly ducklings, and a slight little angle that I'll pretend was completely intentional. Totally planned. Because that's how I do it. I pulled stash prints that coordinated with the charm pack (It's a Hoot), at which point I realized it needed a red binding.


So I made one. Bright red Riley Blake circles. Works with the front and the back.

Perhaps you'd like to see this quilt in person and possibly even buy it for yourself or a loved one? If you're in SE Michigan or NW Ohio or South-Central (???) Canada (what's the Windsor, ON region called?), it will be at the Ann Arbor Modern Quilt Guild Show & Sale this Thursday (November 15) at the Corner Brewery in Ypsi, 5-9 pm. You should come. If I don't know you, I'd love to meet you. And if it doesn't sell at the show, it might make its way to a little pop-up quilt, challah cover, and clutch sale here on the blog, in the near-ish future.

Read more...

Triangulate: Complete

>> Monday, November 5, 2012


I took pictures of this quilt over a month ago, when my backyard had only a sprinkling of leaves on it. There are many silly reasons I didn't post this quilt until now--and one serious one. It turns out that transferring pictures from the camera to the computer is somewhat essential to the blogging process, and not misplacing the cord that connects said technological devices is, well, somewhat imperative. But the cord has been located, the pictures moved, and the blog (is being) updated. This process has also revealed to me that these pictures are not, shall we say, the most amazing. I think I need some new photography angles and venues, and a human helper wouldn't hurt. But for now, they will suffice.


Way back when (in March), I asked the members of do.Good Stitches: Empower to make some triangle-in-triangle blocks. I had a vague notion in my head that they would be cool, and wrote up one way to make the blocks. But I had no real plan beyond that. After fussing with a number of possible layouts on my brother's living room floor, I built the quilt around triangles and lots of Kona charcoal. And then paused while I lived sans sewing machine and pondered the quilting options.


Echoing triangles -- a term I just made up -- won the quilt pondering (who knew it was a contest?). I wanted simple and non-distracting. If I were a fancy quilter, which I am certainly not, or owned a long-arm, which I definitely do not, I could imagine filling the charcoal with awesomely intricate quilting and doing something else I haven't really figured out in the triangles. But absent radical, magical changes in my life, neither of those things were happening. And since I hope this quilt will be well-used by whomever Alternatives for Girls gives it to, I wanted it to remain soft, which minimal quilting helps achieve. To bind it, I used a mixture of Terrain prints in orange and pink.


This is my second-to-last quilt for do.Good Stitches, at least for now. In September, the lovely Empower ladies made fantastic neutral log cabin blocks that I'll be putting together...soonish. I've truly enjoyed getting to know the other crafty women in my group, and love the concept of do.Good Stitches -- working with a group of people to make quilts and donating them. Last year, as I was traveling to archives for dissertation research, this project was one of several things that kept me grounded and provided a certain amount of regularity in a peripatetic (I just love that word!) life. But this year, as I'm sitting down to write, I've found that feeling grounded requires fewer obligations and more flexibility. As a result, after some hard thinking and internal debating, I decided that it was time to let dGS go. I have one more quilt to wrap up, and I look forward to seeing all the incredible quilts the group continues to make, but for now, watching from the sidelines is where I need to be. 

Read more...

Step-by-Step

>> Tuesday, October 23, 2012


120 6.5" squares waiting to be turned into a quilt. A commissioned wedding quilt for a couple getting married in December. The instructions were wonderfully simple: come up with a quilt for a couple whose apartment has a cream/brown/green color scheme. I toyed with several ideas for the quilt, mostly thinking about wide improv pieced curves, a larger version of this challah cover in a different color scheme. But then I saw Felicity's Sea Glass on Sand quilt, I quickly formed a new plan.


I dug into my collection of solid neutrals, added a few more from my (local) quilt shop Pink Castle Fabrics, and started cutting. Moda Snow dominates, as I had some yardage of it, but the pile also includes Moda Porcelain, Kona Snow/Putty/Oyster/Parchment, Fig Tree Cream, and unlabeled neutrals from my scrap bin. I had more shades of green and fewer shades of brown than I expected (or realized). But a sufficient spread to keep the corners interesting. I considered mixing in some prints, but I like the look of all solids.

I'm still considering adding in a few punch of mulberry (shot cotton, that is). I plucked three squares from the pile before trimming so I can play with the layout and change my mind, rip out some seams, and insert a few dots of difference. I usually dread trimming and squaring blocks. But a few episodes of Dexter (I'm still on Season 5) made the work less tedious. The blocks are trimmed and ready for my design floor. Once I sweep and vacuum said floor, anyways.

p.s. In anticipation of Pink Castle Fabrics' move into a new brick and mortar space, everything in the shop is 25% off through the end of October, with the code MOVING. Depending on when you place your order, I might just get the chance to cut and package it for you.

Read more...

The Accidental Living Room Quilt

>> Thursday, October 18, 2012

Making things for myself is paralyzing. How do I decide on a design or choose fabric when I'm not going to design something I dislike or buy fabric that is unappealing? And how do I pick the perfect palette for the living room I already live in? Admittedly, the (super comfortable) gold couch is perhaps not the item I would select from a store, but free, old-in-the-best-sort-of-way, and did I mention amazingly comfortable rocks (thanks grandparents for making some great furniture purchases back in the day).

Two springs ago I was temporarily living in DC. I toted a small portion of my stash with me (sanity protection) and resolved to make stuff within the parameters of what I brought. That small stash included 2 charm packs of Kate Spain's Central Park line, and a lot of solids. I challenged myself to make a big quilt with those charm packs, and by adding a lot of solids, I succeeded.

I followed no particular format in laying out the fabric. I probably tried to avoid setting the same fabrics next to one another, making it not totally random, and I may have adjusted squares as I sewed them together. To be honest, I don't really remember how I did it all that clearly. I do recall wishing I had used green instead of yellow as the most significant solid at one point, but having already cut out  lots of yellow squares, well, no change was in the works. Unlike most of the quilts I make, this one had no intended recipient. As a result, when I finished the quilt top I had no need or incentive to finish it quickly, and it sat on a shelf for months.

Last winter I decided I needed to move this project from the unfinished pile to the finished one. I dug into my stash to find fabric to back it, and decided to use the Alexander Henry Birdsong as the primary backing. Then I added coordinating fabric to make it big enough to fit the front, quilted it 1/4" lines offset from the seams, and bound it. I washed it and wondered to whom I should give it. It sat on a chair in my living room, waiting to move on to its new home.

Summer faded into fall, and one night I wanted to burrow under a quilt while reading on the couch. Rather than dig up a blanket from the closet, I grabbed the one sitting on the chair. I wouldn't have expected the pale yellow to work with the gold couch but, in a way, it does. It's not exactly the design or colors I would have picked for my living room, but it works. The binding isn't my favorite shade of green, but it doesn't really matter. It's a lot easier to let a quilt find a home in my living room than design one specifically for it. So much less pressure, so much more pleasurable.

Read more...

Sewing: It Still Happens

>> Friday, October 5, 2012

The Jewish holiday season, some travel, a chapter deadline, and a few other obligations conspired to make me take an unintentional sewing hiatus. It's kind of hard to sew while on a plane, in synagogue, or while furiously typing. (Though if I could multi-task simultaneous dissertation writing and sewing, I would be a superhero. Just sayin'). In any event, I granted myself some sewing time this week as a reward for submitting said dissertation chapter (incentives: they work). I've had a quilt block in my head for a few weeks now, and decided to test it out. Often this means drawing on some graph paper before cutting and piecing, but this time I decided to go for the direct brain to fabric option.

Mental math is pretty awesome, but sometimes comes with a bit of imprecision. I won't say exactly how many times I had to rip out seams on each of these blocks (probably more than once but less than a handful -- let's keep it in general terms), but there was some mental cursing and aggravated looks directed at the blocks. Millimeters are finicky things, in case that was unclear. Last night the Southeast Michigan Crafty Meet-up allowed me finish some blocks and start sewing them together. At which point a number of people noticed that my quilt color scheme coordinated with my wardrobe (Atomic Washi, woot!), and documentation of this occasion became necessary. One friend has asked why there is a traffic light in the background, and since I don't know, I welcome all suggestions and stories as to how and why a traffic light would find its way into the scene.

Read more...

Clutch

>> Monday, September 24, 2012

It all started very simply. A friend asked me if I had a black clutch she could borrow for a wedding. Alas I have no black clutches in my possession. But why let that be an obstacle? Obviously there was a solution. I'd make her a clutch.

I sifted through clutch tutorials and ultimately drafted my own pattern. I needed to make it quickly, so simplicity was key, but I still wanted it to look interesting. Hence the curved edge on one side. Interest. Also good fabric selection, though I claim no credit for that. Katie did the picking. (The blue floral piece is a Marimekko scrap, the gray is something for which I have a selvage that I could look up if I weren't posting from the library.)

And why make just one? Another friend was about to rock her exams, so a celebratory clutch was in order. The clutches have magnetic snaps and dividers. I've made a few more, and I think they will be one of the items I sell at the Ann Arbor Modern Quilt Guild Show and Sale. November 15. The Corner Brewery. Come! Let me know if you have any clutch color requests as my clutch-making factory is just starting up.


Read more...

A Zig and A Zag

>> Tuesday, September 11, 2012

On rare occasions, I start projects with no real purpose or intended recipient. So it was last fall that I cut out some red, yellow, and aqua squares, and starting playing around with zig-zags.

Fast-forward to this summer when a friend from college very generously offered to let me stay in her apartment while I was in town doing research while she wasn't even there. That deserves a massive thank you. At which point half-baked ideas and projects are really really useful. Those fun zig-zags became a pretty sweet (if you ask me) table runner.

And I had just the right fun floral to use on the back -- with an additional red slab of one of my favorite reds from the front. The runner ended up being about 50 or 52 inches long, a tad longer than planned, but, coincidentally, just the length of her table. And the back shows off teh zig-zag quilting quite well (again, in my esteemed opinion).

I debated adding in another color for the binding, but ultimately decided that the saturated yellow looked best. I was a little under the wire finishing this before I hopped on a plane, but I've become a bit of machine-binding speed demon of late, a skill that comes in handy when you resist hand-binding and need to finish a gift as you're running out the door. Or the night before you're running out the door because 5 am is awfully early and machine-binding at that hour would be dangerous since I generally like having all my fingers, and that week I needed them to sift through papers at the archives.

Read more...

I Made A Dress!

>> Sunday, September 2, 2012

I'm no longer sure whether sewing garments or photographing garments which one has sewn is more difficult. Both are tricky. The instagram/mirror option above does the job, provided no one looks too closely at the state of my mirror. (It's hidden in the closet, who needs a sparkling clean mirror in their closet?)

I finished this Washi dress over 2 weeks ago and have worn it well, let's just say a lot, since then. But I didn't post about it because I needed more pictures, which required enlisting a friend to play fashion photographer. And fashion photography, it turns out, is hard. Hard for the photographer and hard for the model. You know how even catalog models look like they're just going about their day, looking at the pretty sunset or petting a nice horse (who does that wearing a nice dress? Catalog models, that's who) or laughing at what must have been a hilarious joke. That's not easy to replicate. I look absurd doing all of those things (especially petting a horse, since the horse was invisible ).

Now about this dress. First, it is awesome. And not just because I made it. I made a dress! (Got that?) It's awesome because it is super comfortable, can be worn with boots (even if it's 88 degrees during said photo shoot, the boots were key), and has pockets. Pockets. All dresses should have pockets.

Second, it's not all that hard to make. Let's be clear: I make quilts. Occasionally I make bags. I have never once sewn a garment. Wait, that's a lie. I once made a pair of "pants" for a Tempest-themed Halloween costume (I was Ariel, my friend was Caliban, we were nerds, it was great). But basically, I have never made a garment or at least one that needed to last more than one night and fit. Which this delightful dress does. I think it's an advanced-beginner or intermediate-sewer pattern, in that the sewing is not hard but requires being able to visualize how pieces fit together and know how to work with bias binding and the like. But a dedicated beginner could, I think, do it.

{The what-am-I-supposed-to-be-doing-again pose}

It's also an intermediate-esque pattern because it will fit best if you make a muslin and do a full or small-bust adjustment. I made the dress in class with Rae and Karen (best teachers ever), and all but one person needed to make some adjustments. I also added an inch below the bust to move the waist down a bit as I wanted the dress to be a more fitted (within the bounds of the pattern) to fit my figure. A few people asked if the dress will work for pear-shaped folks. My answer is yes. Depending on what measurements and ratios one follows or whether one simply looks at oneself as a line-drawing, I am either a pear-shape or an hourglass-shape, and the dress works for me. I sewed the side seams with a larger seam allowance to work toward a more contoured fit, which I think is more flattering on me, and I think I will make further adjustments to that end in the future, but it's an eminently adjustable pattern, from what my novice-pattern-making brain can understand.

{My second enlisted fashion photographer came up with the tree angle, but knows the red-car-in-background composition is not winning any prizes.}

Third, this pattern is adaptable. As soon as I finished Washi #1, I hightailed it over to Pink Castle Fabrics to buy more fabric for Washi #2, also known as Atomic Washi. I should note here that until I made these dresses, I owned all of two items made from prints. My print-clothing population has now doubled. Which is all to say, I didn't expect to buy this print but I love it, seriously. And each time I've worn this dress out, random people have stopped me to say they love it too. About the adaptability: the Atomic Washi has a round, rather than notched, neckline and is sleeveless. The second time around, I remember to reduce the length of the skirt since I had added an inch at the waist, thus making for a more normal hem.

I'm not sure what Washi #3 will look like, though I'm thinking some Chicopee leaves or paisley might work well. Maybe a contrasting facing or hem band? Options abound.

Read more...

Orbs Away

>> Wednesday, August 22, 2012


I had plans to make a completely different quilt. But Austin was born a couple weeks early and I had a chance to hear about him before I actually made the quilt (the benefit of being behind on gift-making?). Suzi told me that Austin was intense, and vacillated between "Baby Snuggles and Baby Landlord." I wanted to make something that reflected intensity but with a little funk. Then I saw Leanne's pattern-testing post, and followed it to Julie's Mod Pop pattern introduction.


It was time to hack, modify, reverse-engineer. I wanted to make the orbs Julie used but allow them to stand out a bit more (which is also to say I wanted to take advantage of negative space and make a less busy pattern or, ahem, be a little lazy and make fewer orbs and less patchwork). My orbs are imperfect as I trimmed my drunkard's path blocks with a 3/8" edge instead of 1/4" because the piecing foot I was using created a generous 1/4" seam allowance. This was a mistake, but one I didn't realize until it was too late -- or would have required too much seam-ripping for my taste. Crafty imprecision and imperfection are rather fetching, I think, though I realize not everyone feels the same. Which is all to say that I'm not sure what Julie's instructions call for, but you can get her pattern here if you want to make her version or don't want to fiddle with sketches, graph paper, or numbers to make your own.


Besides, if you squint hard enough, the edges look perfect. Just squint harder and you'll see what I mean.    Lovely as it is, Moda Dill does not match any of the thread choices at my local Joanns. In the past, I've simply used a lighter green, but since I was at the store and needed to buy thread, I decided to make a radical move into variegated thread. That stuff is cool.


I used Moda Dill as the background color for three reasons: 1) I had a bunch of it, 2) Suzi likes green and she'll be seeing the quilt in its full color glory before Austin will recognize green as a distinct color, and 3) I really wanted to use the Alexander Henry Zoo print on the back. I've had the big and mini zoo prints in my stash for several years and they had proclaimed a need to be used (on their chatty days, obvs).


Every time my eyes focused on the elephant in the zoo print, I worried that my stippling had gone awry and there were random threads dancing across the quilt back. I don't know why the white line on the elephant was so different than the lines across the giraffe or ostrich or rhino, but it was different. Alas, it turns out my eyes were playing tricks on me. For the binding, a print from the blue/green colorway of Denyse Schmidt's Picnics and Fairgrounds line helped bring together front and back.

Read more...

  © Blogger template Autumn Leaves by Ourblogtemplates.com 2008

Back to TOP