Bandwagon: Jumped

>> Sunday, March 25, 2012

A few weeks ago, I decided that the thing to do between research trips was make drawstring bags. I had seen plenty pop up all across the internetz, and most referenced Jeni's tutorial. So I jumped on the drawstring bag bandwagon, which seems to have retained its popularity for quite some time, and made a few. I've given most of them away, but kept the one on the left above for myself. It's proven quite helpful as I travel -- I stuff all my chargers in there (still waiting for that universal charger....) and their aesthetics improve muchly. I'm about to leave for another trip, and this time the bag holds chargers, my camera, and my sunglasses. Pretty sweet.

These bags are the perfect size for using up small-but-not-quite-scrap-sized pieces of fabric. I will say that these bags are fun, though midway through my assembly-line, I remembered that I find making multiple bags at a time somewhat tedious. Nevertheless, I soldiered on and made six of them. I admire those who make lots of the same item to sell because I don't have that in me. I can make quilt blocks for hours on end but with bags, I'm a one-and-done kind of gal. I'll return to patterns I like, but even when they don't take that long to assemble, I'm just not that interested in repeating steps over and over again.

In other news, I was honored to receive a Liebster Award from Charlotte, who blogs at Twelfth Zodiac. The award--whose origins are unknown, as best I can tell--is for small blogs and helps spread the word about them. In that vein, if you haven't checked out the following blogs,* you should.

Michelle's Musings: A big fan of Tula-Pink fabrics, Michelle should get the award for best blog commenter. Not only was she one of the first to start commenting here (which led to a lovely friendship -- we even met in real life in November!), but I swear that every time I get ready to comment somewhere else, she already has.

Kitty Kitty Crafts: Not only does Karissa make fabulous stuffed hippos, but she makes her own dresses, something I find amazing and intimidating.

WoollyKat: Anna is now a real-life, local, quilty friend. Choosing a local quilt friend was tricky, since I'm lucky enough to have quite a few, but I decided to go with the first live, local person I added to my reader and Anna was it. Also, we have very similar taste and tend to echo one another in favoriting and commenting on items in the FTLOS swap.

The Quilt Engineer: I don't think there is a single quilt Latifah has made that I don't like. She is more than a quilt engineer; she is a quilt genius. She makes brilliant, bold geometric quilts, and sews up matching clothes to boot (at least for the babies).

Little Olive Branch: I'm not sure how or when I first stumbled onto Ruth's blog, but it's got a little of everything -- sewing, cooking, knitting, traveling, and more. She moved to DC from New York as I was transitioning to New York from DC for research last year, so I guess I felt a little transitory kinship.

*I'm basing "small size" on the number of followers I can see, either on the blog or via Google Reader.

Read more...

Seriously Awesome

>> Friday, March 23, 2012

No, seriously. Awesome. I returned from Cincinnati to a box filled with these fantastic goodies. My For the Love of Solids Swap (FTLOS) partner, Diane, "got" me perfectly. {Note: in my experience, FTLOS has provided the best swap experience, hands down.} Not only did she make me fabulous items -- a sewing machine cover and a zippered pouch -- but she included homemade tomato jam (I love tomatos. Really. Love them) and a stack of chocolate whose wrappers match the sewn items. Impressive.
Let's take a closer look at these sewn items. Diane used the colors I requested (betty's orange, glacier (teal), and ochre (deep yellow)) and added aqua and cerise for a fantastic color combination. The background fabric is quilter's linen -- this is the first time I've seen it up close, and I'm smitten.

The sewing machine is completely reversible. Look at this cool improv back! And you can sneak a peek at the light brown walls -- doesn't this make my sewing machine into an art piece in the living room? I've been debating what colors and fabrics to use in a living room quilt, and this sewing machine cover seals it for me. I obviously need to make a coordinating quilt. Because these colors make me so happy. And they work with the gold couch (the best reading couch ever, but gold nonetheless).

To top it off, Diane sent this lovely pouch. Those blocks are tiny and perfectly precise. And the aqua zipper? Pure happiness (and awesomeness) all around.

Read more...

Amidst the Wildflowers

>> Friday, March 16, 2012

My phone battery is dying. This is not really a big deal, except that it aggravates me. And it bothers me not because every night my phone emits a low-grade whine, alerting me to its wounded state, a mere half-day after it juiced up overnight. That is indeed annoying. But what agitates me is technology's forced obsolescence. The phone -- a Samsung something for Verizon -- is a year and a half old. I use it to make phone calls and send an occasional text. I don't surf the web or take pictures or check my email on it. It replaced a phone I held onto for over 5 years. Because the only thing I want my phone to do is make phone calls. And have a battery that lasts longer than 12 measly hours. Especially when I am traveling. I mean I'm just walking around today, as I'm staying about 12 minutes away from the archive I'm using. But I'm away from home and like staying in touch with people. Actually being away from home is sort of irrelevant as most of the people I talk to on the phone regularly don't live where I live. Whatever. I just want manufacturers to make batteries that last for more than 18 months. I'm sure they are all listening to me and will get on this immediately. Because I asked so sweetly. Or something.

So my little rant above has next to nothing to do with sewing, crafting, or that lovely photo above. About that.

I'm in Cincinnati right now, and I was lucky enough to coordinate my visit with a friend whose Bubbe (Yiddish for grandma) lives here, and I stayed with my friend and her Bubbe for 4 nights. Obviously I needed to bring a gift, and I sent a few emails to my friend to ascertain what might be appreciated. And then ignored the options of flowers and chocolate in favor of playing with fabric. I made a challah cover using Rachel's improv curves Rainbow-Road concept. I took all the 5" solid squares I had handy in my scrap bin, chopped them in half-ish, and started to sew. All very random and improv-y, just the way I like it. Since spring wildflowers are my favorite part of my front yard, it seemed only right to photograph the challah cover in their midst and show off those cute yellow flowers, whatever they may be.

I actually made 3 challah covers in this style, with different color schemes, but the others are being transported to their destinations, and will therefore remain hush-hush for now. This might be the 2012 Challah-Cover style, since it's good to have a yearly go-to. And why not be a trendsetter in the dashing world of crafty Judaica? Ok, the archives have made me a little punchy. But with that, shabbat shalom and have a wonderful weekend.

Read more...

Chevron and Out

>> Monday, March 12, 2012

I realized it's been 10 days since I last posted. Ten busy days, but ten days in which images sat on my camera because sometimes getting images from the camera to the computer feels like way more work than it actually is. Hooking up cords and pressing buttons is not actually hard and yet sometimes it's an obstacle. But I'm back in the archives this week which means I needed my camera for images of documents and all my sewing pictures had to vacate the premises, err memory card. I finished up my mini-quilt for the For the Love of Solids Quilts. I vacillate on which side is "up" and which side is "down." For now, I picked the image I liked the best, which had a lot more to do with low light on a gray day than anything else. I'm quite pleased with how it came together as well as the random, angular line quilting, which came to me in a burst of inspiration also known as "Must get this done. Make a decision."

The back used remnants from the front. As usual, I changed my mind 3/4 of the way through and decided that the light gray line (Kona Ash, for those keeping track) should not go all the way across. This entailed some pretty precise sewing to get everything lined back up. And by precise sewing, I mean 4 seam-rippings and 5 tries later, it all worked out. Note: seams pressed open are your friends when precision on the millimeter level is necessary.

For the small gift (this swap requires a big item and a small one), I made a zip pouch. I based it on the size of the zip-lock I use to carry various chargers with me when I travel. I think its dimensions are great for chargers though I might switch the zipper to the long side on future iterations, even though I think it might work less well for bulky chargers. The pouch is stuffed with a rainbow of solid scraps that I hope my partner will enjoy using. Now I just need to find the closest post office to me in Cincinnati, ideally one open past 5 pm.

Read more...

Stretching Out

>> Friday, March 2, 2012

So many tiny pieces. So many bias edges.

I probably should have invested in some starch before I embarked on this project, but why use an easily accessible tool when you've never felt the need to before? And, to be honest, it wasn't until I was sewing these little bits together and trying to square everything up that I realized starch could have helped. Next time...except, I have no plans to piece or paper-piece tiny little chevrons any time soon. I'm really glad I was crazy enough to plunge into making this without thinking through all these details as I think (hope) my partner will be pleased. And I'm glad that participating in swaps pushes me to do things I never would have thought of alone. But I feel sufficiently limbered up to avoid practicing this particular design any more for a while. I know, I know -- this is the exact opposite of what any coach, in any sport or activity would tell you to do. Luckily, I'm not aiming for the Quilting Olympics and can thus resume flitting around to other techniques and playing with new ideas with no remorse and no ill consequences.

Read more...

Batting & Basting

>> Wednesday, February 29, 2012

I keep scraps: fabric scraps, flannel scraps, batting scraps. I've become a little more ruthless over the years, only keeping scraps of a reasonable (to me) size and flannel/batting pieces that I could realistically use. I was ready to baste a quilt with what I thought was a sufficiently large piece o' batting, only to find out that it was a touch too slim. At which point I not only remembered my bag of batting pieces but also that it's possible to fuse batting pieces together. Well, fuse via sewing machine, not heat. That zig-zag stitch will nicely unite batting in a seam that needs no pressing and therefore has no extra bulk. It was super easy to do. And provided me with just the right size of batting.

At which point I moved onto basting. I am going to let you in on a big secret: I break all the rules of basting. I do not tape anything to the floor. In fact, if I'm basting a big quilt, I don't have enough floor space to lay everything out and keep it all smooth. So I've developed a trademark lazy two.hippos method (patent pending, of course). First I iron the batting and the backing. This gets everything all smooth and keeps the two pieces together (fabric "sticks" to batting as it is, this just gets it into place nicely). Then I lay it on the floor, sometimes draped partially over the area rug (bottom left) that has nowhere else to go. Then I place the top on the batting, arrange it just so, and pick a spot to start pinning. In the case above, I started from the side you can no longer see, opposite the end you can (does that make any sense?)

Depending on the design of the front and the back as well as how much extra room I have to work with (because, shhh, I don't always make the batting 2" wider and longer and the backing 4" wider and longer. Sometimes I do, and sometimes I don't), I start pinning from the middle or from a corner. (If you need the corner to stay just so, it's best to start there and work outward in a fan pattern). Then I start pinning. I purposefully don't tape anything so I can move things around and smooth out potential puckers as I work. I find this adaptive method much better than having things taped down and accidentally pinning puckers. It's not that no puckers ever form this way but rather that if and when they do, I'm more likely to feel them and fix them as I go. I will often reach under the quilt to feel and shift the backing. Much easier to do this when there's no tape in the way. And, when space (or lack thereof) demands it, I start rolling the quilt up to get the remainder of the quilt sitting evenly on the floor to finish. also, this creates a nice buffer for your knees, which usually want some cushion by this point in basting. I should note that rolling works only if you start pinning from one side rather than the middle.

And with that, happy leap day! I'm flying back to Michigan today. Woot.

Read more...

Tutorial: Triangle-in-Triangle Blocks

>> Monday, February 27, 2012

While pretty and full of potential, square-in-square blocks must occasionally give way to other polygons. It's the triangle's turn, and I'll be asking my fellow quilters-in-crime to make triangle-in-triangle blocks for do.Good Stitches in March. Although trendy rarely describes two.hippos' general ethos, it turns out I am quite fashionable this month as Lynne will also be debuting some (wonky) triangle-in-triangle blocks.

These blocks are pretty easy--dare I say straightforward--to make. Start with an equilateral triangle of whatever size you prefer, add a border of another fabric, rinse and repeat until you get to the desired size. I started with 4 triangles ranging from 3" to 6" and it took 4 rounds to reach 12.5" from a point to an edge (that is, the line bisecting the triangle, not the length of the triangle's edge). 

This tutorial assumes basic sewing knowledge. It also assumes an ability and willingness to go with the flow since precise measurements are intentionally lacking. The amount of fabric you need will vary by a) the starting triangle and b) the width of the strips you attach to create the next triangle.

1. 
Cut out some equilateral triangles. Quick geometry review: equilateral triangles have three sides all the same length (hence: equal) which means each corner has a 60 degree angle. I happen to own a plastic template, but you can easily make your own by drawing a triangle, printing one from your computer, or using your cutting board which may well have 60 degree angles marked. If you're cutting a triangle from a charm square, a 4.5" one is your best bet.

2. 
Cut strips for to surround your triangle. They can be any width, though anything less than 1" may be a touch tricky the first time out. Make sure your strips extend beyond the points of the triangles. This is very important; otherwise you will not create a full triangle and will spend needless time ripping out seams. (Guess who did this the first time around?). I recommend erring on the side of lots to trim for trimming is far less time-consuming (albeit a little fabric-wasting) than seam-ripping and re-sewing.

3. 
Sew the first strip to one edge of the triangle. See how the strip extends way beyond the points? That's good. Now press your seam (I press open, but you could press to one side).

4. 
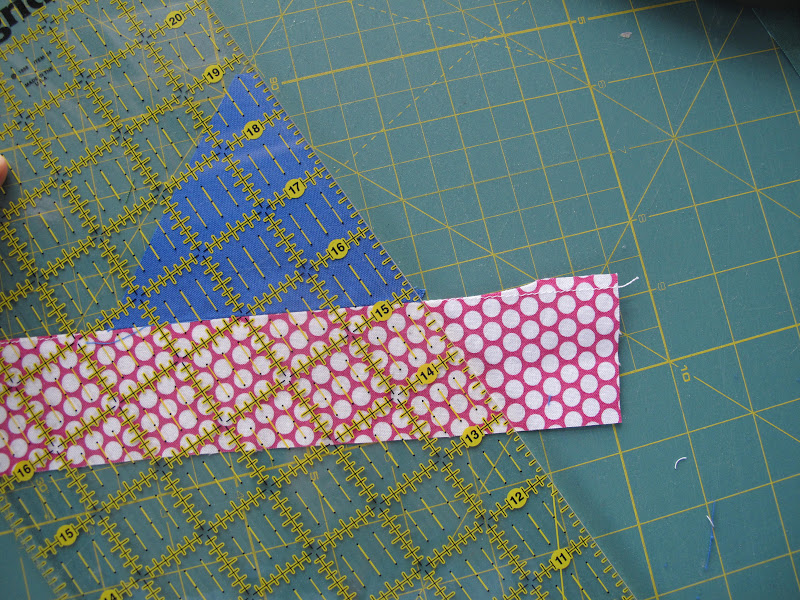
Now you can see why you need a strip longer than the triangle's edge! Line your ruler up with the triangle's edge and trim the newly added strip. Then trim the other side. All should be good.


5. 
Sew a strip to the next side. It doesn't really matter which one, as the both options are adjacent to the already-sewn side, but you'll probably want to continue adding strips in the same order. I tend to add them counter-clockwise. Why, I have no idea.

6.
Trim it up. You could stop here if you just want to make some tents -- for a campsite quilt perhaps?

7.
Add the third strip and trim it up. At this point, you also want to "triangle" up the block. Apply the same principle as squaring up blocks: decide how wide the strip should be, measure from the edge of the inner triangle/row (e.g., place the 1.5" line on the seam between the blue and pink), and trim. Repeat for each side. This ensures, to the best of bias edges' existence, that your triangle will remain a triangle.

8.
Rinse and repeat. Err, start adding a new round of strips: sew, trim, sew, trim, sew, trim. Triangle-up. Do this as many times as you need to get the desired size you would like.

9.
Admire your finished triangles. (Note: these are very easy to chain-piece, so if you know you'll be making more than one, I recommend chain-piecing.) Contemplate how to sew them together.

10.
The end. Or a few postscripts. 
a) you could add strips that are the same or different widths
b) contrasting widths can create cool effects
c) this is a great block for prints and solids
d) I'd love to see what you make
e) check back in April to see what I do with the dGS triangle blocks.

Read more...

Gentle Curves

>> Tuesday, February 21, 2012

Even I can be a delinquent student. The one who shrugs off an optional assignment as unnecessary. The one who figures "I've already done that" so why redo it. The one who prioritizes other things. In this case, the class is Rachel's Curves class and I confess that I waited until the "Rainbow Road" project to do anything more than watch the videos and read the project instructions. Because I don't need any bibs (though they would make a nice gift) and I had already made a scallop quilt, I passed on the first week of projects. Also, I was in Kansas sans sewing machine, which made it somewhat impossible to sew anything.

But I knew I would try my hand at improv curves and this project in particular. Never one to exactly follow instructions, I turned to my scrap bin instead of a rainbow of solids, and came up with this orange and aqua meandering path. I also started piecing the orange and aqua scraps together before the instructions were posted so I constructed each row a little differently, but to no ill effect. I think it's going to become a challah cover once I bind it (perhaps in a reddish-purple?). I also think it will be gifted to a friend, but that's a surprise for now.

This week's classes focus on precise curves -- which I really want to figure out. But I'm reclaiming the sewing slacker label for the next week as I'm off to Utah for research, sans sewing machine yet again. However, I am under the impression that there are amazing quilt shops on every corner of every street in Utah, so please point me to them! I'll be in Salt Lake City for the most part, with a possible day trip to Provo for some material held at BYU's library and special collections. Of course, restaurant, sight-seeing, and other recommendations are always welcome...

Read more...

Twirl

>> Monday, February 20, 2012

It's Michonne's month in do.Good Stitches, and she asked for Ribbon Blocks, with yellow stars and aqua ribbons. These blocks are going to create a lovely quilt. That said, making these blocks made me very happy that I came of quilting age in an era of modern quilting, because lots of little pieces that need to fit exactly into place would not have led me to prolific quilting (and the prolific fun that results from it). Now, these weren't difficult to make, they simply required a lot of instruction-checking and concentration. And much like I prefer to free-form it in the kitchen with recipes as a starting point (that adage about baking requiring precision is rubbish! Or at least only sort-of true: if you know what cake/brownie/cookie dough/bread batter should feel like, you can adapt), so too do I relish a certain imprecision at the sewing machine. But one of the benefits of do.Good Stitches is regularly moving outside the sewing comfort zone and that's a good thing, even if it lands me back in the comfort zone...

...of some improv log cabin blocks. Carrie asked for some volunteers to make blocks for a quilt for Avery, a young gymnast who recently fell and was paralyzed. As a former gymnast who has stayed somewhat involved in the sport (some coaching, some meet-directing, and now mostly spectating), this particular quilt project felt especially important, and these blocks were fun (and quick!) to make.

Read more...

Head.Paper.Fabric

>> Thursday, February 16, 2012

Exactly one month ago, I received an email detailing my For the Love of Solids partner assignment, which included her likes, dislikes, and swap desires. I clicked on her mosaic and wandered through her flickr favorites. I quickly knew exactly what I would do. The plan simmered for abut 30 days. With the exception of some minor color tweaks, the plan remained the same. In my head. Day after day, I would think about it, contemplate it, dissect it, diagram it, arrange it. In my head. The project took form, the puzzle pieces arranged themselves, the idea came into being. In my head.

Finally, it boiled over. I had to sketch it out, to attach numbers to proportions, to map and adjust the layout. Three pages of graph paper later, I was ready. Ready to cut, to manipulate, to piece. Ready to make templates, to draw angles, to add seam allowances, to create. And with the aid of my cutting mat and rulers, with pen and paper, I drew lines. And redrew them. And copied them. {Side note: when one's printer/scanner/copier is out of black ink, it is best to hit the "color copy" button if one wants said machine to spit out more than the blank page fed into to it minutes before.}

Several hours later, my FTLOS project was truly underway. Head.Paper.Fabric. All in one night.

Read more...

  © Blogger template Autumn Leaves by Ourblogtemplates.com 2008

Back to TOP